ABOUT THIS BLOG

"A Faithful Attempt" is designed to showcase a variety of K-12 art lessons, the work of my art students, as well as other art-related topics. Projects shown are my take on other art teacher's lessons, lessons found in books or else designed by myself.
Thanks for visiting!
LAND ACKNOWLEDGEMENT I acknowledge, with deep respect, that I am gathered on Treaty 7 territory. I acknowledge the many First Nations, Métis and Inuit whose footsteps have marked these lands for generations. I respect the histories, languages and cultures all the Indigenous peoples of Canada, whose presence continues to enrich our community.

Thursday, August 22, 2024

Smudged Oil Pastel Hearts


This is a great first class lesson to warm up a new class. It's pretty fast, so depending on your class length, students might be able to take a project home on their first class, which I personally love.

It also involves cutting skills and fine motor skills so you can use this to gauge student abilities and modify future lessons from there. You can also teach/review symmetry and positive/negative space.

I found this lesson HERE on the 2 Soul Sisters Art Ed blog

I taught this lesson to a Grade 4/5 class.

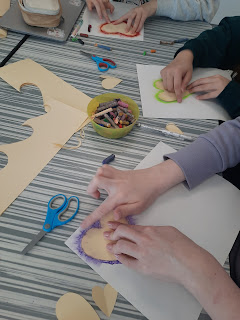
Start off my folding cheap manila tagboard in half vertically. Cut out three different sized hearts. 


On scrap paper, color along the edge of the heart with oil pastel. Use a nice thick layer. We use Pentel brand but I think Crayola brand would be even better as I find it's much softer in consistency. 
Place heart on white copy paper and hold down with one hand. With the other hand, use one finger to smear or smudge the oil pastel outwards onto the white paper.


Then start adding in the other sizes, encouraging students to create a symmetrical design
 (flip over heart to the opposite side).


Some finished artworks- this took about one 40 minute period to complete. 


Sunday, August 18, 2024

Black & White Doodle Design with Pop of Colour


This is a project I first blogged about back in 2011. I've taught it once more since then, but now keep this art project in my sub folder in case I'm sick and require a substitute teacher. It only uses markers and paper so it's a perfect lesson to leave.

See all the steps posted HERE.
I found the original lesson HERE.


Grade 7-9 artworks:


Sunday, August 4, 2024

Model Magic Seahorses


This was a project I managed to squeeze into the last week of school this past year. I realized I still had a classpack of Crayola Model Magic and wanted to use it up. So I came up with this seahorse project.
These were created by a mixed class of Grades 4-6. 
Everyone LOVED this project including the staff at my school. 

They started by drawing an underwater scene using pencils. 
Then they traced over everything with Sharpie.


They painted everything with watercolours. 
Some used a white wax crayons first to add wavy resist lines in the water.


Once dry, paint over the whole scene using liquid blue watercolours.


The next class, we watched a couple of tutorials on how to make a clay seahorse on Youtube. 
Then each student got a pack of model magic- they could mix and match with friends 
in order to get different colours. 


I had some toothpicks on hand to use a detail tools as well as googly eyes.


These all need to dry overnight- we place ours on wax paper, then they don't stick. 
The next day, I flip them over so they can dry evenly on the back as well. 
Some googly eyes fell off, so I just glued them on with a dot of white glue.


SO CUTE


Finally, students hot glued their dried seahorse onto the background. I had lots of model magic scraps leftover, so students could make small fish to add to their artwork. 


Work from Grade 4,5,6 students.


Related Posts Plugin for WordPress, Blogger...