ABOUT THIS BLOG

"A Faithful Attempt" is designed to showcase a variety of K-12 art lessons, the work of my art students, as well as other art-related topics. Projects shown are my take on other art teacher's lessons, lessons found in books or else designed by myself.
Thanks for visiting!
LAND ACKNOWLEDGEMENT I acknowledge, with deep respect, that I am gathered on Treaty 7 territory. I acknowledge the many First Nations, Métis and Inuit whose footsteps have marked these lands for generations. I respect the histories, languages and cultures of all the Indigenous peoples of Canada, whose presence continues to enrich our community.
Showing posts with label African art. Show all posts

Monday, November 18, 2019

Korhogo Cloth Paintings


Korhogo cloth is an African textile made by the Senufo people of Korhogo, Ivory Coast. Korhogo comes in neutral and earthy tones like browns, blacks and creams. Korhogo is made by hand painting designs on hand woven and hand spun cotton fabric. The paintings are done using a specially fermented mud-based and natural vegetable pigment that darkens over time, and designs are usually drawn on using a stencil. They are decorated with symbols of humans, natural elements like the sun, moon and stars and animals, all of which are rooted in Senufo culture and mythology. (source)


I started off by showing Grade 6 students a map of Africa. I love incorporating geography into my art lessons. I like to emphasize that Africa is a continent not a country!!  Students learned where the Ivory Coast is and I showed them a slideshow of different types of Korhogo.

actual sample
So Grade 6 students started by drawing a border and filling it with a pattern. They all wanted to use rulers but I told them they needed to look handmade and more organic. Then they chose animals to illustrate and filled them with the typical line patterns. 


I mixed up some brown tempera with some black to create a dark brown shade. Students collected sticks from outside and then traced over all the pencil lines with the paint. The kids found using the sticks super frustrating so I had to continually encourage them to keep going!


This project took quite a while to complete! We used fairly large paper so stick to smaller paper if you want it to go by faster. 
Some Grade 6 results:


Wednesday, October 1, 2014

Colorful Zebras!


This was a project completed with blood, sweat and tears- all mine!!!! My Gr.2 students made these but it was a long, slow process for sure! I found the lesson HERE on the "Color Like You Mean It" blog. She made them with her Kindergarten students!! So I am totally impressed with that!
For my kids, I felt there ended up being too many steps- they managed to make them in the end, and they turned out great, but next time I teach this, I'll try it with Gr. 3 kids instead, I think.

You need three sheets of cardstock/heavy white paper per student. Paint each one with colored stripes. We used tempera pucks as they're so convenient and work great with large groups of students. I have two kids share each tray.

The rest of the instructions were in the comments section of here blog; they were really useful:

"The only shapes I gave them were the ovals for the eyes and noses. It was quicker for me to cut those than for them to trace and then cut, mess up, retrace, then cut again... Repeat... :) For the body, we used one of our 9x12 sheets and trimmed off the corners. The head and neck was another sheet cut in half and rounded corners. The legs were the 4th sheet cut in half longways, then each half cut in half again to make 4 long strips. Their last painted sheet was used for the ears, so it worked perfectly for those students who may have missed a day of painting because we had plenty left over to share!"


It took my students one-40 minute class to paint all the papers- even then, some kids didn't finish. I had to make sure they wrote their names on each sheet of paper. There were striped papers everywhere!!  Once they were dry, I stapled them together in the corner so they would be easier to pass out the next class. The next class, we worked step-by-step as a class completing them. Even then quite a few got lost, so we'd have to stop, backtrack, repeat, etc... 
But the end results were worth it (barely, lol) and they are quite large and very colorful!


Wednesday, February 22, 2012

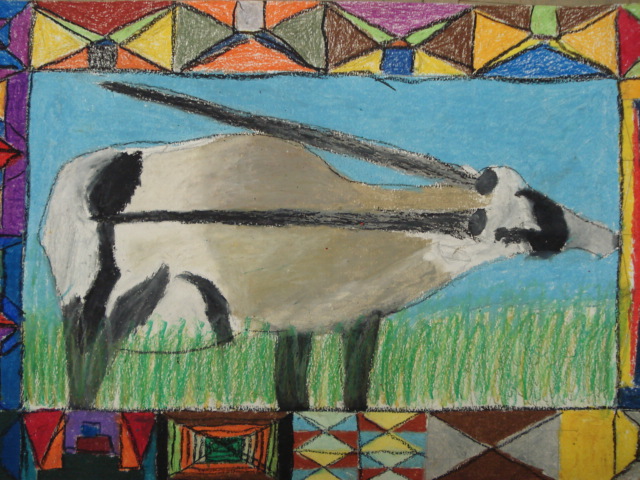
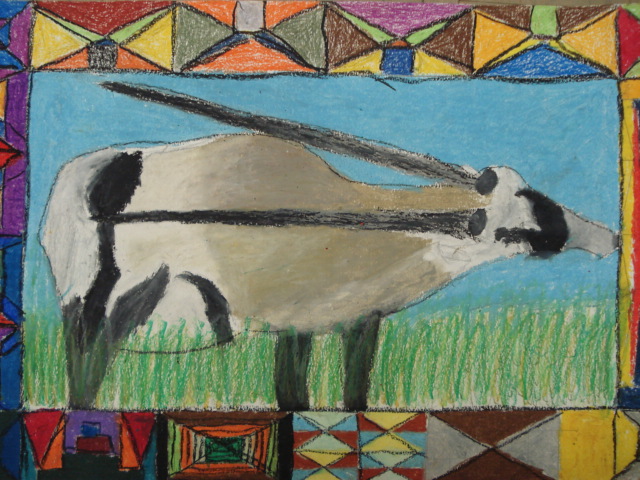
Ndebele African Animal Drawings


This is an oil pastel project I did with a Grade 7 class based on the art of the South Ndebele people who live in South Africa.

The Ndebele are world famous for their brightly painted houses as well as beadwork. The women of the Ndebele traditionally create the wall art of their home. The tradition and style of house painting is passed down in the families from generation to generation by the mothers.

The house were traditionally built with mud bricks and plastered with mud. Feathers or bundled-twigs were used as brushes to apply the mixture of clay and dung onto the prepared surface. The Ndebele used to paint their homes with cow dung but changed as clays of different colours were added to produce black, red, white, green and yellow.

Today, of course, they buy commercially made paints. The walls are whitewashed  and then geometric patterns and shape are drawn with the rich black outline and later filled in with vivid colour. There are five main colours typically used: red and dark red, yellow to gold, a sky blue, green, and sometimes pink. The colour white is always used as the background because it makes the bright patterns stand out more. (Source)


When I lived in Southern Africa, one of my goals had been to visit a traditional Ndebele village. I saw photos of these colorfully painted houses in my parent’s National Geographic magazines growing up and was always fascinated by them. They seemed so contemporary and unlike any other ‘typically’ African architecture. During Xmas break, I was able to visit the Mapoch Ndebele Village, which is located outside of Pretoria in South Africa. 
You can see more photos of the village here.

 It was one of the most interesting guided tours I’ve ever been on, I suppose, because it was primarily arts-based. I also got the chance to meet the famous Ndebele artist, Francina Ndimande. I asked her a few questions about her technique. While she was very reserved and succinct with her answers (to say the least!) she did tell me that she uses no references for inspiration- all the designs come from her mind. She also doesn't pre-plan any ideas. I also asked her if she used a ruler to achieve the perfectly straight lines and she said no.
The guide told us that the art of house painting may die out because the young people today are ‘lazy’ (lol) and not willing to learn the craft. There’s a really beautiful gift store there with all proceeds going to the artists. So I was able to buy a small painting by Francine and a traditional beaded doll.


So for the project, I introduced the students to Ndebele art through a slideshow of photos. I also passed out my own personal photos so they would have ideas and inspiration for their border design. Students also brought in a photo of an African animal of their choice.
They started off by measuring and designing a thick border (at least 2 inches) filled with bold geometric shapes.


Once the border was complete, students drew the animal inside. They could choose to draw only the head (cropping) or the whole animal. Once drawn, students coloured the animal using oil pastels. I encouraged them to lay the colours on THICK and mix and blend a variety of colours for more realism. Then they coloured the border. 
For the final touch, students outlined the border shapes with a thick black outline. 
Just FYI, you will not have any black oil pastels left after this project! 
(I always try and buy extra separately)


Grade 7 results: Ta da!


Bulletin board display:


Related Posts Plugin for WordPress, Blogger...