ABOUT THIS BLOG

"A Faithful Attempt" is designed to showcase a variety of K-12 art lessons, the work of my art students, as well as other art-related topics. Projects shown are my take on other art teacher's lessons, lessons found in books or else designed by myself.
Thanks for visiting!
LAND ACKNOWLEDGEMENT I acknowledge, with deep respect, that I am gathered on Treaty 7 territory. I acknowledge the many First Nations, Métis and Inuit whose footsteps have marked these lands for generations. I respect the histories, languages and cultures of all the Indigenous peoples of Canada, whose presence continues to enrich our community.

Sunday, July 13, 2014

Inside-Out Seascapes


This is a great lesson I found in a 2007 edition of "Arts & Activities" magazine. It was created by Art Teacher Judy Kalil from Florida. It's a seascape lesson with a twist- the seascape is inside the underwater creature's body, so it's super fun and imaginative for students!

I've done this lesson both as a watercolor and with colored pencils (perfect for a sub lesson). 

So students started off by researching and choosing an underwater creature to draw. Fish are more or less the simplest and most popular, but you can also look at whales, sharks, octopuses, etc.
Draw the main outline/shape of the body. Don't add any details inside the body other than an eye and a mouth. Draw some sand along the bottom of the ocean and a few little seascape-y accessories.
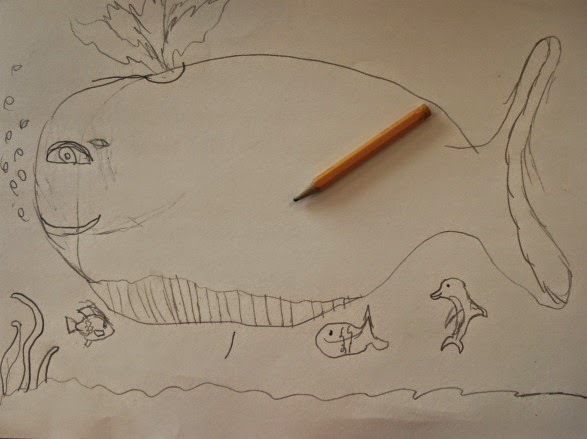

Inside the body, draw the main details of the seascape. We brainstormed ideas of what one might find in a seascape (boats, pirate ships, islands, palm trees, coral, etc.) to help give a starting point.


Once the drawing is complete, outline everything with a permanent black marker/pen.


Next class period: crack open the watercolors! 
We painted the inside seascape first and then the background last. 


Completed watercolor examples:


Colored pencil examples:


Wednesday, July 2, 2014

Mondrian-Inspired Animals


I finally got around to trying out the popular "Mondrian Animals" lesson. I originally saw it in "Arts & Activities" magazine by art teacher Berniece Patterson - find the lesson plan HERE.

It's a great project for those on a budget because it uses very simple supplies: white paper, regular water-based markers and a ruler. I started off by showing kids a slideshow of Mondrian's famous squares and rectangles art. We talked about the colours used, why he might have limited his colour palette and if they thought his artwork would be easy to create or not (seeing as it's so simple.) His style of art is considered 'non-representational'.


Piet Mondrian (1872-1944) Composition C (no.III), with Red, Yellow and Blue, 1935

Kids started off by drawing a simplified outline of an animal of their choice. They were instructed not to include any details within the body other than a simple eye. The, using a ruler, they drew horizontal and vertical parallel lines within the animal body. Keeping the lines parallel proved to be quite a challenge for them!! I find that students rarely use rulers (for drawing straight lines at least) these days in class, and it shows during art class!! 


Once all the lines were drawn, students coloured in some of the shapes using Mondrian-esque 
colours of red, yellow and blue with touches of black. 
The last step was to use the ruler again to trace over all the lines with a thick black marker.


Wednesday, June 25, 2014

Bugs in the Garden


I found the perfect art project to tie into an insect unit Grade 2 students had just finished. 
I found this lesson on the art blog "K-8 Art" here.

I pre-traced (used a large plastic ice cream lid) a whole bunch of large circles onto medium weight white drawing paper. Students could choose any flying insect they wanted- most, if not all, chose a dragonfly or butterfly. Draw that off-center somewhere, focussing on getting the correct body parts (head, thorax, abdomen, wings, antennae). Then, fill in the rest of the circle with a variety of flowers. We discussed variety and how it makes an artwork more interesting to look at. We talked about varying the sizes, heights and types of flowers. After drawing in pencil, ideally you should have the kids outline the flowers and insect with a permanent black marker. We had run out, however, so used washable black markers at the end, once the watercolour step had dried.


Color in everything, except the sky/background, using wax crayons. 


Students had fun painting over the whole image with watercolor paint. Let dry.


Once dry, you can outline with black markers like we did, then cut out the circle.


Ta da!


Friday, June 20, 2014

Kandinsky Trees Collage


Ah, the ever popular "Kandinsky Tree" art project. Not sure who originally had the idea for this lesson, but it exploded all over pinterest with a wide variety of media and techniques. We went for the 'it's the end of the year; let's use up all the colored scrap paper" technique. hahaha!

Students started out by looking at some of Kandinky's abstract works. I explained to them that this artist was considered one of the first artists to use abstract art. I find it really challenging explaining to this age group how avant-garde a painting like the one below was in 1913. His concentric circles remains one of his most iconic works. He was heavily influenced by classical music such as Wagner, even stating that "music is the ultimate teacher."
Wassily Kandinsky (Russian), "Color Study: Squares with Concentric Circles", 1913

So students started out by drawing a bare tree with branches on a brown sheet of construction paper. Cut that out. The background is simply colored paper with some green paper grass on the bottom. They could cut this or rip it for more texture. 


Glue the tree on top. Then, using scraps of colored paper. cut out a small circle. Glue this circle to a larger piece of colored paper. Cut around it leaving a border. Repeat until you have 3-4 layers of circles.
Once a few of these are made, arrange them on the tree, finding a composition that looks nice and balanced, and glue them on.


Ta da!


Thursday, June 12, 2014

Rainy Day Pictures


A cute Spring project Grade 2 students did a while back. They drew a little boy or girl standing in a rain puddle holding an umbrella. They made 'dashes' in the sky using water-based markers. We sprayed them with a water bottle and the markers dissolved slightly to give a wet, hazy effect to the sky. I was inspired by this project by Whitney Elementary School on Artsonia.

Start off by drawing your picture in pencil. Outline with a permanent black marker.
Color in the whole picture, except for the sky, with colored pencils.


Using water-based markers (we used Crayola), draw small dashes all over the sky. 
Kids can mix colors; whatever they want. Random note: after I showed kids my example, I had to reeeaaally emphasize that you never go outside during a lightning storm! hahahaha  My picture actually looks a bit dangerous- but the boys, especially, loved the lightning bolts! lol


Once the sky is done, use a spray bottle filled with water and spray the entire picture. I encouraged students to use lots of marker in the sky- it makes for a more vibrant picture in the end. We talked about why the marker 'bleeds' (they think this term is so weird!) and why the colored pencil parts stays the same. 


Voila!


Related Posts Plugin for WordPress, Blogger...