ABOUT THIS BLOG

"A Faithful Attempt" is designed to showcase a variety of K-12 art lessons, the work of my art students, as well as other art-related topics. Projects shown are my take on other art teacher's lessons, lessons found in books or else designed by myself.
Thanks for visiting!
LAND ACKNOWLEDGEMENT I acknowledge, with deep respect, that I am gathered on Treaty 7 territory. I acknowledge the many First Nations, Métis and Inuit whose footsteps have marked these lands for generations. I respect the histories, languages and cultures of all the Indigenous peoples of Canada, whose presence continues to enrich our community.

Sunday, June 8, 2014

Birdhouse & Bunting Collage


I wanted to create a whimsical Spring-y/Summer-y art project to celebrate warm weather after a looong winter! So Grade 3 students made these charming and colorful birdhouses out of colored paper. 
I gave each students a blank sheet of white paper that already had blank bunting drawn at the top. They colored these in with colored pencils.


Then they cut out a birdhouse shape from colored paper and chose construction paper strips that I had pre-cut on the paper-cutter into about 6" long strips by 2" wide. Then they glued on a brown paper 'pole' at the bottom. Finally they added a black paper circle for the birdhouse entrance.


Using construction paper scraps, students then drew and cut out a simple bird shape. Using another color of paper, they drew, cut out and glued on a paper wing. Then they added a paper beak, a googly eye (they could also easily draw on eyes) and finally glued on a tail feather. 

We glued thick cardboard squares underneath the bird's body and then 
students glued their bid onto the birdhouse wherever they wanted it. 
The cardboard square underneath the bird helps it 'pop-out' a bit, which I think 
looks nice and gives it a bit of a relief/3D element.

Finally, the kids drew in random designs (flowers, insects, whatever) with 
a black marker and colored them in with colored pencils. 
They also drew designs on their birdhouses using markers, etc.
I think they all came out pretty cute and the kids were thrilled with them!
Happy Summer everyone!



Wednesday, June 4, 2014

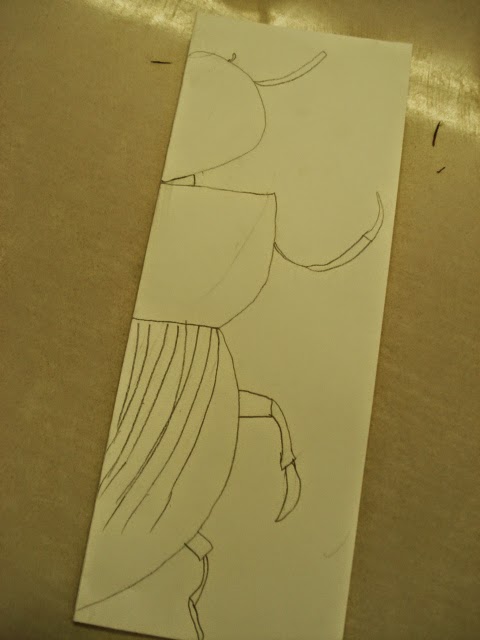
Beetles


I really love the simplicity of these beetle drawing completed by Grade 3 students. First, students discussed and looked at photos of darkling beetles. We discussed the main parts of a beetle's body (head, thorax, abdomen, three pairs of legs, etc). I demonstrated how to make a symmetrical drawing of the beetle by folding the paper in half (as seen below) and only drawing half of the beetle. Fold the paper in on itself and rub the back of the drawing with the handle of a pair of scissors. The image will transfer to the other side. I gave this only as an option to the kids- they were free to draw the whole beetle with out folding the paper.


Once the drawing was complete, they could outline it with a black marker.


Then they colored them in nice and dark with black colored pencils. I demonstrated how to create some highlights by leaving certain areas white- to help show how hard and shiny a beetle's body is.


Saturday, May 24, 2014

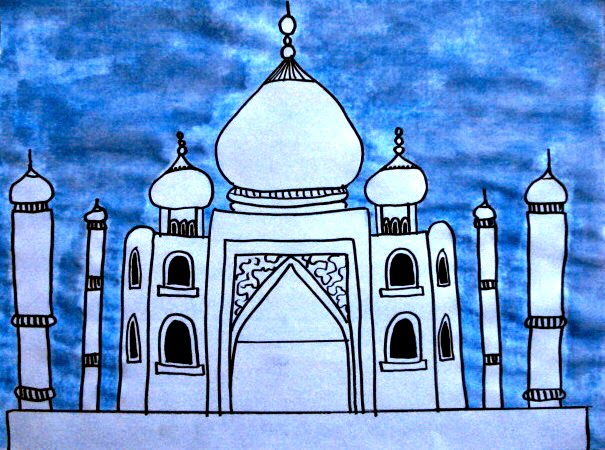
Taj Mahal Symmetrical Drawings


This is a great lesson if you're studying the art of India or architecture. My goal with this project was to teach students how to make a symmetrical drawing by using the 'folded transfer paper' technique. It's a bit detailed and time-consuming but the results are worth it, in my opinion. You often see this technique used with a butterfly.

We started off the project by looking at photos of the Taj Mahal and discussing the lines/colors and shapes involved in it. I also gave them some background info on it (date built (1632-1653), purpose (it's a mausoleum!), etc.)

Start off by folding a sheet of white paper (landscape format) in half horizontally. 
I projected a photo of the Taj Mahal on the smartboard so students could see the details. I told them to look for simple shapes. Starting from the fold, draw only half of the Taj Mahal. Imagine a dotted line going down the middle of the Taj. Important: use dark drawing pencils for this- like a 4B or higher.


Once the simplified drawing is complete, fold the paper in on itself and rub the back of the drawing with the handle of a pair of scissors.


When you unfold the paper, the image will have lightly transferred to the opposite side, creating a perfectly symmetrical drawing, or mirror-image.


Trace over these lines with a pencil.


Then, use a permanent makrer to trace over all the pencil lines. This step, frankly, is optional. I really like how the pencil drawings looked just as they were and contemplated stopping at that stage. But I didn't. lol


I felt the drawing, at this stage, looked somehow unfinished, so I discussed with the kids what we could add for colour. We finally decided upon using watercolor pencils as they are very neat to color with, so it's wouldn't get too messy and ruin our drawing.
So choose any color and fill in the background- press good and hard for bright colors.


Using simply water and a wet brush, gently paint over the background. 
The watercolor pencil crayon will dissolve and look lovely!


Grade 3 results


Sunday, May 18, 2014

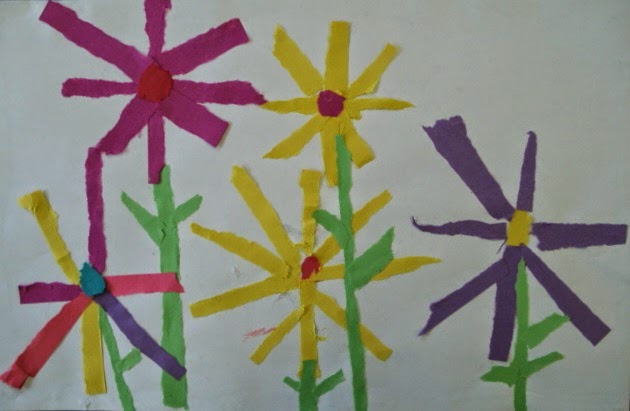
Torn Paper Garden Collage


This a great 'towards the end of the year' art activity where you can use up all those scraps of colored scrap you've saved and accumulated all year.
I explained to students that we would be using tearing paper with our hands instead of cutting it using scissors. I demonstrated how to make a few different types of flowers and then had them practice a bit. A few were definitely frustrated in the beginning, and asked if they could 'just use scissors'. But I encouraged them to keep at it and that it would get easier, with practice.
Students started off by creating a minimum of five flowers on white paper. I encouraged them to try different types of flowers, and to vary the size and the height: some short, some tall, some medium. 
Glue these on the paper using a glue stick.


Once the flower heads are all glued on, then attach the stems.


Finally, glue on some leaves.


Related Posts Plugin for WordPress, Blogger...