ABOUT THIS BLOG

"A Faithful Attempt" is designed to showcase a variety of K-12 art lessons, the work of my art students, as well as other art-related topics. Projects shown are my take on other art teacher's lessons, lessons found in books or else designed by myself.
Thanks for visiting!
LAND ACKNOWLEDGEMENT I acknowledge, with deep respect, that I am gathered on Treaty 7 territory. I acknowledge the many First Nations, Métis and Inuit whose footsteps have marked these lands for generations. I respect the histories, languages and cultures of all the Indigenous peoples of Canada, whose presence continues to enrich our community.

Wednesday, August 24, 2011

A "Body" of Art!


This is an art project that uses body parts to create a large banner. It is a very personalized artwork that is especially suitable to primary grades.  

This was actually the first art project I ever taught in my first job with my first Kindergarten class. Today, I doubt I would try this on the first day of classes with a group of 4 and 5 years olds I have never met!!  However, as a first year teacher I was somewhat inexperienced but very enthusiastic and jumped head first into this project!

I found this project in a very old education magazine about nine years ago- I have no clue what it was called and have looked extensively online for the source, but have had no luck. 
So, whomever developed this lesson- thank you!!

Here's how we made these banners:

Note: you can easily adapt the materials you use for these- use whatever you have or are comfortable using with your class.There are six sheets of artwork. If I did this again, I would have pre-printed all the lines on each sheet and made enough copies for each student. Live and learn, eh?

We completed about one sheet  per class. Have another project or some free drawing/coloring on the go as you need to work one-on-one with students and there is drying time involved. It's very helpful if you have a parent helper or teaching assistant to help you with this project. Trust me.
Also, have folders ready for each student to store the in-progress sheets in.

The first sentence is:
"my lips kiss like prize-winning roses..."

So simply get some cheap-o red lipstick, put it on the kiddies lips and have them kiss the paper to make the roses.  I was afraid the boys would  think this was totally wierd, but they, in fact, loved it and laughed alot. The kids draw stems and leaves and grass with markers and watercolours or crayons.  Whatever you want.


The next line is:
"my hands paint butterfly wings..."

So, paint the kids hands whatever colour you want, use tempera paint, and make two handprints for the wings.  Using scrap paper, collage on a body and then have the kids decorate the wings however they want (collage, paint, crayons, glitter, etc.)


The next line is:
"my thumbs gently place ladybugs on a leaf..."

Have the kids draw and cut out a leaf from green paper. Then paint their thumbs red and print them all over a green paper leaf.  Let dry and then add ladybug details with a black marker.


The next line is:
"my fingers can identify my whole family..."

Using scrap coloured paper, have students create something that represents where they live (house, apartment). My sample is a generic house, but it's nicer if the kids try to create something more personal, if possible (depending on the age and ability). This would be a time to review simple shapes with Kindergarten kiddos. Then, paint the kids' fingers and have them press down the number of people in their family. My kids liked to include their pets as well. Let dry and then have the kids draw on faces/features onto their little figures with fine markers.


Next line is:
"my fingerprints make flowers bloom..."

Have the kids draw stems and leaves with a marker. 
Then, using a variety of paint colours, make fingerprint flowers.


OK- last line- phew!
"my feet march with **insert city/province/state/or country** pride."
"A Body of Art"

Now you need to paint each student's foot (be prepared for loads of giggles as it's totally ticklish) and print that onto a sheet of paper.  Let dry, then draw the details of the country flag and paint those on.  Hopefully you don't have an impossible flag like a maple leaf which is actually incredibly frustrating to draw!!!


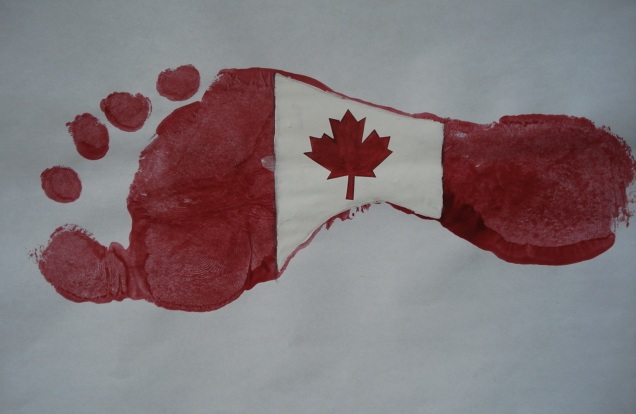
Ok- assembly time.  You can create a long vertical banner like I did, or even hole punch them in the top corner and tie them together in a little book format. Whatever works.
I used a large sheet of coloured paper (in this case wrapping paper) and glued all my sheets on.


Lastly, because I didn't pre-print my sheets, I had to glue the sentences on.  I painted them with some watercolours first to add some more colour and help them stand out. But it's easier and takes less time to print all the sheets out ahead of time. Trust me. It's also fun to add some glitter at the very end. I love glitter.


Here's my finished sample. Unfortunately I don't have any photos from my students, but they were all super cute as only little kids art can be! They are all different and personalized due to the kids' colour choices, etc.
To send these home, I simply rolled each one up and secured with an elastic.


Friday, August 19, 2011

Illustrated Recipe


This was a sketchbook assignment I gave to my Grade 10 students.  They were to choose a recipe (preferably a favourite recipe they've made before) and illustrate it in whichever medium and method they wanted. I was surprised with this assignment how many students don't have favourite recipes. I'm a huge fan of the artist Wayne Thiebaud and love any art that's related to food.

Here are some of the results:


This Kulfi recipe is very delicious and easy! I've tried it!
Add  a can of mango pulp and you've got amazing mango ice cream, no ice cream maker required!


While we're on the topic of food, here's a gorgeous video I found on the Tiger in a Jar website that shows how (in a very artistic way) to make beet cake.

Watch the video below:

"There is something beautiful about the baking process. The way flour feels in your hands or the sound of eggs cracking on the edge of a bowl. Baking is a gathering of interesting materials, a mixed medium art piece of sorts, that ends in a cake instead of a canvas."


beet cake from tiger in a jar on Vimeo.

Monday, August 15, 2011

Fire Drawings: Etsuko Ichikawa


I found this gorgeous video profiling artist Etsuko Ichikawa on the Anthropologie website. She's a Japanese artist who currently works in Seattle. I was absolutely blown away by the originality and subtle beauty of these 'fire drawings'. She essentially makes "pyrographs" by painting onto paper with the fire and smoke of hot glass. Discovering her medium was, like many great discoveries, an accident. Years ago, Ichikawa was assisting a Japanese glass artist, when the glass she'd gathered for him dripped off of the pipe and onto the floor. She gasped at the beautiful mark it left on the concrete. "It was shocking, visually. Really intriguing," she says.

Watch the video below.  Visit her website for more videos and photos of her work.


Thursday, August 11, 2011

Acrostic Name Poems

Roudrashini

These are acrostic name poems written by a former Grade 2 class. Most of the students in this class had English as their additional language. I designed this simple project to accompany Book Week at our school- the theme that year was "Poetry".

An acrostic poem is very easy to write. It can be about any subject. This kind of poem can be written in different ways, but the simplest form is to put the letters that spell your subject vertically, down the left side of your page. When you have done this then you go back to each letter and think of a word, phrase or sentence that starts with that letter and describes your subject. In this case, students had to think of things about themselves.

Students wrote these first in pencil, then went over them in permanent markers. They then used watercolours to paint transparent patterns over their poem. I emphasized that they needed to use alot of water to keep the colours nice and 'see through', or transparent, in order to still be able to see and read their poems.

Some of the boys who had quite short names were really happy as they figured the project would be 'easier' for them! Overall, you get some really cute and funny poems- it's amazing, really, what they think of. ('apple-eater' was a popular one as you can see- I think one girl thought of it and the rest thought it was so cool so they had to use it too- oh those Grade 2's!)


Anna-Lena

Frederik
 
Bram
 
Ankitha


Jakob

Sebastien

Louis


Monday, August 8, 2011

Iznik Tiles from Turkey

This is a very interesting video on traditional Turkish tile making I found on the cool hunting website.

A celebrated Turkish art form dormant for more than 300 years, Iznik tiles play an integral role in Turkey's Ottoman Empire history and the production of them today is a labor of love.

This video features Istanbul-based architectural historian Gökhan Karakuş, who takes us through the history and modern-day labor-intensive process of making these beautiful tiles.

I love videos that show the process of how things are made, particulary traditional art forms. It makes one appreciate handmade objects much more once they see the time, skill and energy that goes into them.


Cool Hunting Video: Iznik Tiles from Cool Hunting on Vimeo.

Monday, August 1, 2011

Foil Embossing (Repoussé)


This is a foil embossing project, known as repoussé, that I did with a Grade 11 IB class. 
It requires designing a highly detailed image onto foil and then aging it with ink.
I find that students who enjoy doing linocutting quite enjoy this process as well, as it requires patience to work with a fairly slow process with fine detail.

From Wikipedia:
Repoussé is a metalworking technique in which a malleable metal (copper, brass, aluminum, etc) is ornamented or shaped by hammering from the reverse side to create a design in low relief. Chasing is the opposite technique to repoussé, and the two are used in conjunction to create a finished piece. It is also known as embossing.

I had my students first research the art of repousse and record it in their sketchbook.  Googling words like embossing, foil embossing, metal embossing and repousse will get them the most variety of results.  They also looked at repousee from various cultures and time periods, some good examples being Bronze Greek armour plates, Assyrian, Phonecian and Etruscan art.

Here's a sketchbook page showing this student's research:

So here's how I made my sample in order to show my students the process and steps:
I found an image I wanted to emboss- in this case a matryoshka doll image from a card I had.


Draw the image onto a sheet of regular white paper the same size as your foil.

You can buy embossing foil on a roll, for example here, or in individual sheets.
Place your drawing on top of your foil and tape it down.  Place it all on a stack of newspapers (you need a soft surface) and then lightly outline your entire drawing with a dull pencil or ball point pen. How hard you press depends on the thickness of your paper and foil.  Practice on a scrap sheet first.
Once you have your image transferred, you can start embossing. Make sure you work on a stack of newspapers and use a dull pencil. Press over the lines to make them pop out more.  Try flipping over your design and doing some chasing on the back.


Then, to age it and create more dimension, you paint the foil using India ink (waterproof black ink). We simply painted it on, then wiped away some with a paper towel. The ink will stay in the recesses and make the overall design pop out more.  Experiment until you get the amount you like. 
You can also try this with acrylic paint. Once this is all dry, you can mount these onto colored paper- use rubber cement or hot glue to attach the foil- white glue doesn't seem to work.


Here's a lovely landscape scene a student made. It illustrates an excellent use of a variety of textures and surfaces: tree bark, feathers, cobblestones, roof tiles, etc. She also cut away parts of the foil.


Starting the embossing on a stack of newspapers.

Painting over the design with black ink.

Detail of the texture:


Student reflection in sketchbook:


Here's another student work- she used red ink, instead, to give a bit of a different feeling to the piece.


Related Posts Plugin for WordPress, Blogger...