ABOUT THIS BLOG

"A Faithful Attempt" is designed to showcase a variety of K-12 art lessons, the work of my art students, as well as other art-related topics. Projects shown are my take on other art teacher's lessons, lessons found in books or else designed by myself.
Thanks for visiting!
LAND ACKNOWLEDGEMENT I acknowledge, with deep respect, that I am gathered on Treaty 7 territory. I acknowledge the many First Nations, Métis and Inuit whose footsteps have marked these lands for generations. I respect the histories, languages and cultures of all the Indigenous peoples of Canada, whose presence continues to enrich our community.

Monday, November 30, 2015

Holiday Wish Tree


This is a display I, along with all the students and staff in my school, helped to create.
Each year, we make a Thanksgiving Tree with leaves saying things we are appreciative of.
 It was suggested that we make a winter version of the tree.I thought of making the 'leaves' out of snowflakes. I had an idea in my head of how I wanted the tree to look (handmade, whimsical) but had no idea if it would turn out or not.
So this is how I made it:
I used the large bulletin board paper that comes on rolls. I cut two long rolls of white and slightly overlapped them and glued them together so I could draw out a large tree 
(about 5' tall and 4 1/2' wide). I cut this out- this was, by FAR, the hardest part!! The paper was so thin and it was a huge pain to cut out- took forever (ok, like 40 minutes, but still)!!
Anyhoo, once cut out, one of the super helpful office staff members hung up the tree (also a huge pain, I'm sure, because it was super 'floppy') on a big glass wall in our school's entranceway.


Then I felt the tree should be a colour so the white snowflakes would contrast with it. I love pretty pastel colours in winter, so yup, pink it was! I had some students volunteer to paint it for me. It took them about 20 minutes to paint the whole thing during recess.


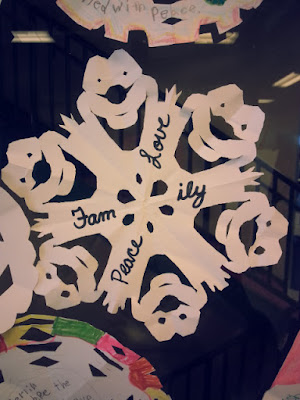
Meanwhile, I sent out a circle template on regular photocopy paper out to all the homeroom classes (K-12) with simple instructions on how to fold and cut a simple snowflake. They had to leave the center un-cut as to have a space to write their "holiday wish". We encouraged the students to write about something outside of themselves (ie: not to wish for a specific gift for Christmas or something like that). It brought up some good discussions within the homeroom classes.


Once the snowflakes were finished, the super awesome office staff hung up all the snowflakes on the tree. Throughout the week it slowly got filled up as classes completed their snowflakes.
Obviously the Kindergarten students had help cutting out their snowflakes and the teachers verbally asked them what their wish was and wrote it for them.


Overall I'm pretty happy with how it turned out and it's become a great conversation piece with many parents, students and staff reading it throughout the school day.
Some of the snowflakes are thoughtful, some are super cute and others 
are funny as you can see below!


Thank you to one of our amazing Kindergarten teachers for writing the title- they always have such neat printing! 


Every school has one of those students, hahaha!


Keep wishing for those dragons!


Kindergarten- I like how the teachers added little stickers- cute touch!


Thursday, November 26, 2015

Cookie Observational Drawings


This was an observational drawing lesson I did a while back with a mixed grade level class consisting of students from Grades 4 all the way up to Grade 12! 
This was an options class that students could choose to take, hence, I get my 
most dedicated artists in the class.

I bought a box of the classic fruit creme cookies (on sale!!)
They have both nice lines as well as a pop of colour. I love the classic vintage look of these.
The good thing about these cookies is that they never go off so they lasted three weeks no problem!

I turn off all the lights in my classroom and have the students rely on the natural light that comes from the large window at the end of my room. It's helpful to have only one light source when you're doing any type of observational drawing.

Some students are working on their chess piece observational drawing as well.
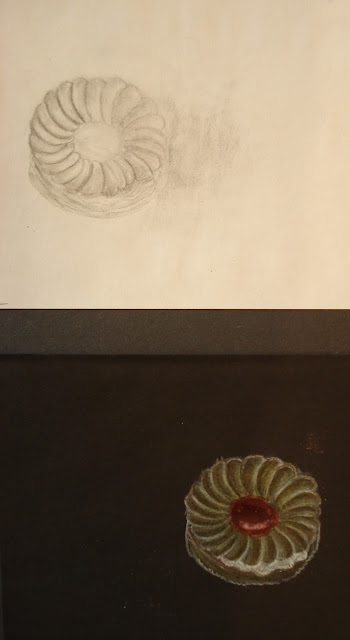
 Students had to complete three drawings: a simple line contour, a shaded drawing and 
then a colour version using coloured pencils on black paper.

CONTOUR:


SHADED:


COLOURED PENCILS:


Once they were all completed, they mounted them onto a sheet of black paper.
Each drawing took at least one class period (40 minutes).


Sunday, November 15, 2015

Fibonacci Spirals


I teach a class on Fridays called "MART" which is essentially art projects inspired by Math. Students from Grades 4-6 can choose to take this class. So for this project I was inspired by THIS watercolour painting.

Before beginning, we watched a couple of videos to help the students learn about the Fibonacci number sequence and to learn how to draw the spiral.


This one below, by the amazing Vi Hart, absolutely blew our minds. Not only is she a genius at Math, she's an excellent artist!


The Fibonacci Sequence is the series of numbers in the following sequence:

0, 1, 1, 2, 3, 5, 8, 13, 21, 34, ... and so on

The next number is found by adding up the two numbers before it.


The Fibonacci sequence is named after Italian mathematician Fibonacci. His 1202 book Liber Abaci introduced the sequence to Western European mathematics although the sequence had been described earlier in Indian mathematics

The Fibonacci numbers appear everywhere in Nature, from the leaf arrangement in plants, to the pattern of the florets of a flower, the bracts of a pinecone, or the scales of a pineapple.

The Fibonacci sequence leads to the golden ratio and spirals. The Fibonacci Spiral is a special spiral, a self-similar curve which keeps its shape at all scales (if you imagine it spiraling out forever).


So, starting on graph paper, students wrote the number sequence at the top of the paper to refer to.


They also got a handout to help them along the way. 


I only managed to get to, I think 13, before I got flustered and confused as to which way to go on my paper. But most of the students really got it (I am terrible at Math!!) and made quite large spirals- up to poster size.


Some students went really large and had to tape 6 sheets of graph paper together
 as you can see below!


Once the spiral was drawn correctly on graph paper, students traced their design, using a window (a great alternative to a light table) onto heavy white paper (smooth cardstock, the type for photocopiers, works particularly well for this technique). Smooth poster board also works well. 


Then we used the bleeding markers watercolour technique to 'paint' out spirals.
Trace the inside of a section with a line of water-based markers, then blend over the line using a brush and water. Crayola and Prang markers both work well for this technique.
Of course you could also simply paint these using watercolour paints (we like the Prang brand, Crayola is also very good.)


Some Grade 4,5 results!


Related Posts Plugin for WordPress, Blogger...