ABOUT THIS BLOG

"A Faithful Attempt" is designed to showcase a variety of K-12 art lessons, the work of my art students, as well as other art-related topics. Projects shown are my take on other art teacher's lessons, lessons found in books or else designed by myself.
Thanks for visiting!
LAND ACKNOWLEDGEMENT I acknowledge, with deep respect, that I am gathered on Treaty 7 territory. I acknowledge the many First Nations, Métis and Inuit whose footsteps have marked these lands for generations. I respect the histories, languages and cultures of all the Indigenous peoples of Canada, whose presence continues to enrich our community.
Showing posts with label Summer. Show all posts

Wednesday, June 13, 2018

Plasticine Pictures: Seasons


My mixed Grade 4-6 class recently completed these plasticine/modelling clay pictures. They are based on the work of Canadian artist/illustrator Barbara Reid. She uses plasticine to illustrate children's books. Her website is wonderful and has video tutorials of how she uses plasticine to create her pictures. I showed these to my students before we began the project.

I previously posted this lesson HERE that I did with younger grades- their theme was farm animals. 
I wanted to try these again with my older grades and many of them remembered doing 
them in Grade 2. The theme I gave this class was: Seasons.

This time they used the inside cuts of mat board. I get them for free from my local Michaels. It worked really well as it's really thick and sturdy. I also gave the option of using the paper plates they used before. They started off with a basic sketch of their landscape. 


Then they work from the background to the foreground, mixing colours if they need to.


I buy my plasticine in big blocks then chop it up with a knife 
and store the lumps in zip lock bags. 


Some Grade 4 - 6 results:


Sunday, August 20, 2017

Paper Loop Flowers


An easy and fun summer craft that would make a lovely Mother's Day craft. I did this with my Grade 4's during the last week of school- it was simple enough to prep for a teacher tired at the end of the year yet fun enough for my kids to keep them busy and entertained for two classes! Win!

They started off by painting heavy sheets of white paper (cardstock works great) 
with liquid watercolours. Let these dry.


The next class, students used a ruler to measure 2cm strips on the back of their paper. 
Some wanted to make them thinner.


Then they traced a circle (use a lid) onto construction paper and decorated then. They glued their paper strips into loops and glued those onto the back of the circle.
I found bubble tea straws at the Dollaw Store- they worked much better for the 'stem' than regular straws- much sturdier. I used a glue gun to attach the kids flowers to the straws.


Some Grade 4 flowers:


Friday, July 28, 2017

Funky Flamingos


This is one of my all-time favourite projects to do with my Grade 4's. The results are always colourful and fun and the flamingos are so charming to look at.
We start the project by doing the background seascape first. On heavy white paper, they use either tempera cakes or watercolours to paint a simple three level seascape: sand, ocean and sky. 
This takes one class.
Next class, I start off my showing a Youtube video about fun flamingo facts. 
Then, using photo reference material. students each do one practice drawing of a flamingo. 
Then, on heavy white paper, they draw their good copy, outline in Sharpie and paint it using tempera. I give them red and white to mix their own shade of pink as flamingos 
come in varying colours of pink/coral.


Once dry, some students need to touch up their flamingos with Sharpie again. They choose a pink tail feather and have the option of using a sticker googly eye. I have virtually given up on using regular googly eyes as I have never found a glue to keep them on!! Any tips from art teachers out there? 
Finally, they cut out their flamingo, glue stick it to their background paper and bring it to me so I can hot glue on their tail feather. 


Some Grade 4 results:


Sunday, May 28, 2017

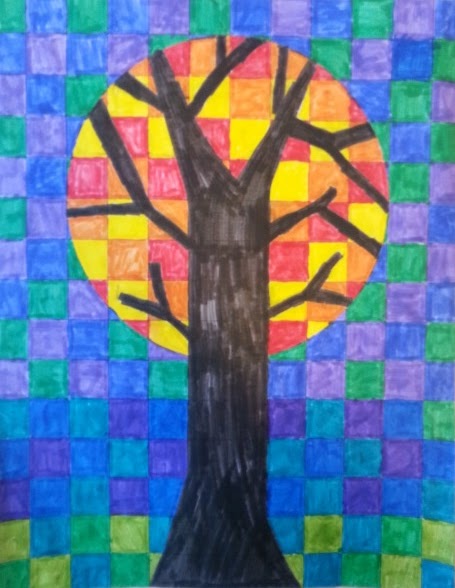
Circle Grid Trees


This is a wonderful lesson to teach towards the end of a school year. It's fun, it's colourful and it's summery. But, it also takes quite a bit of focus and patience; a perfect art project for when the kids (and teacher!) are getting antsy for summer vacation. I've definitely noticed all of my classes starting to get louder, more hyper, so this is the time of the year when I pick my lessons very carefully in order to create a sense of calmness in the Art Studio.

This circle grid tree lesson is all over Pinterest, but I followed the excellent lesson found on the wonderful art website "Art Projects for Kids". Thank you as always Kathy!

I printed off the grid template onto regular photocopy paper. You could also print it onto cardstock if you want to paint these (I've yet to figure out how to manually feed cardstock into our complicated school photocopier!!)
I made two sizes: regular 81/2 x 11" small paper for the slower students and 
then blew it up to 11 x 17 for the faster students. 

I taught this lesson to a mixed Grade class: Grades 4 - 6.
First they sketch out their tree in pencil; many included patterns.


Then some started by outlining their trees in black, brown, etc. Then they used either cool or warm colours to colour their tree, then the opposite for their background. I gave them the option of using markers or coloured pencils. Younger students could also use wax crayons.


Highlighters are also great to colour with!


This project took a surprisingly long time- at least 4- 40 minute lessons to complete.

Some of the Grade 4 - 6 results:


Related Posts Plugin for WordPress, Blogger...