ABOUT THIS BLOG

"A Faithful Attempt" is designed to showcase a variety of K-12 art lessons, the work of my art students, as well as other art-related topics. Projects shown are my take on other art teacher's lessons, lessons found in books or else designed by myself.
Thanks for visiting!
LAND ACKNOWLEDGEMENT I acknowledge, with deep respect, that I am gathered on Treaty 7 territory. I acknowledge the many First Nations, Métis and Inuit whose footsteps have marked these lands for generations. I respect the histories, languages and cultures of all the Indigenous peoples of Canada, whose presence continues to enrich our community.

Monday, October 24, 2016

Spooky Branches


This was a super messy project but well worth it, in my opinion! 
I found the lesson HERE on the Elle & Lou blog and it gives great directions. 
Instead of charcoal, we used chalk pastels for the background

Grade 6 students started out by tracing a circle for the moon, then blending different dark tones of chalk pastel (including black) to create a moody night sky. 
The desks (and floor! and students!) were covered in chalk pastel!!

The next class students drew on a tree branch- this was really difficult for alot of them! I was actually surprised- even after I demonstrated it for them, quite a few struggled, so next time I teach this I will have them draw a practice branch first. Then they painted the branch using black tempera paint.


For the final step, they highlighted the tops of the branches with white chalk.


Sunday, October 16, 2016

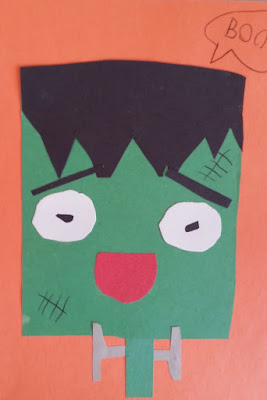
Frankenstein's Monster Portraits


Here are some pics from last October. My Grade 2's made Frankenstein's Monster Portraits out of construction paper. I was inspired by THESE collages I found on Artsonia from Benfield Elementary School.

I gave kids a choice of orange or purple background paper. Then they went to town cutting and gluing and had a blast. Of course, many of the girls asked if they could make a 'girl version' so I told them about Frankenstein's (Monster's ) Bride. 
Lots of discussion here in terms of symmetry and how to create different types of facial expressions and moods. As well, of course, great practice for cutting skills.
I love how funny they all turned out!


Monday, October 10, 2016

Chalk Pastels and Glue Sunflowers


A classic, crowd-pleasing project. Grade 6 students 'drew' a large sunflower onto black paper using glue- we use Elmer's Clear Glue- makes for nice shiny black lines). 
The next class, they colour them in using chalk pastels. 
This is definitely messy, so leave extra time for clean-up!


Wednesday, October 5, 2016

Sunflowers in Oil Pastel & Paint


So it's been sunflowers galore this month with many of my classes in school. I go through phases of hating and then LOVING sunflowers. So this year is a loving year, haha!

I had my Grade 2 class create two different artworks using Van Gogh's Sunflowers series as inspiration. For the first one they used oil pastels (took about two- 40 minute classes to complete) and then they tried again using tempera cakes (again, about two- 40 minute periods to complete).

For the oil pastel version, students drew their still life's on large 12 x 18" coloured 
construction paper. 
I used THIS LINK from the Art blog "Teach Kids Art" for some tips and tricks. Thanks, Cheryl!
My younger kids use the Crayola brand oil pastels and they're pretty good- nice and chunky for smaller hands to grip onto. The one thing I don't like about them is that the wrappers come off them really easily.


The following week, students tried their hand again at sunflowers. This time, instead of drawing them in pencil first, they went in straight with a paint brush on 12 x 18" white paper.

I find tempera trays super convenient to use with larger classes. The colours aren't as vibrant as liquid tempera, but they last FOREVER and are easy for the kids to use and share. I teach them how to mix colours on their paper. Four kids share about 2 or 3 trays at each table, with a big ice cream pail of water in the middle. It works pretty good and clean-up is pretty pain free. TIP: spray your tempera cakes with water in the morning before class to get them damp and ready to use!


Some Grade 2 results:


Related Posts Plugin for WordPress, Blogger...