ABOUT THIS BLOG

"A Faithful Attempt" is designed to showcase a variety of K-12 art lessons, the work of my art students, as well as other art-related topics. Projects shown are my take on other art teacher's lessons, lessons found in books or else designed by myself.
Thanks for visiting!
LAND ACKNOWLEDGEMENT I acknowledge, with deep respect, that I am gathered on Treaty 7 territory. I acknowledge the many First Nations, Métis and Inuit whose footsteps have marked these lands for generations. I respect the histories, languages and cultures of all the Indigenous peoples of Canada, whose presence continues to enrich our community.

Saturday, December 22, 2012

Snow Globe Drawings


Here are some super cute snow-globe illustrations created by Grade 1 students. 
I provided each student with a large circle drawn on regular white drawing paper. We brainstormed ideas of things they might see inside a snow-globe. Even though students contributed a wide variety of ideas, we still ended up with loads of snowmen ;) lol- easy to draw, I suppose...

I've also taught a slightly different snow-globe project with older students (Grade 6). 
Click here if you'd like to see it.

So they started out by drawing their picture in pencil first.Then they coloured in their picture using coloured pencils. They coloured everything except the snow (leave white obviously) and the sky. 

For the sky, just for something a little different, we used watercolor pencils.
 
Let these dry and then cut them out. Then students cut out a slightly large circle out of blue or turquoise construction paper and glued the white snow-globe onto it. Then they cut out a black triangle for a simple base and glued that behind. The last step was to dip the end of a thin paintbrush into white paint, and 'dab' snowflakes all over their picture. 
I threw on some white ultra-fine glitter over the wet paint for added SPARKLE!!! 

Tadaaa!


Monday, December 17, 2012

Doily Snowmen Collage

This little guy makes me so happy! :)
It's like he's leaping through the snow saying, "Weeeeeeeeeee!"

This is a fairly simple collage snowman project that's great for the last week before winter vacation when the kids are getting all squirmy and antsy. These adorable characters were created by
Grade 1 students and the whole project took them probably about 30 minutes or so. 
 
The only materials required are paper doilies (we used the same size ones as that's all I had on hand, but you can also use three different sizes), scrap coloured paper, background paper (we used blue and turquoise), white crayons or oil pastels (for the snow), scissors and glue sticks.
 
First, students coloured some snow on the bottom of their background paper. Then they glued on the two doilies, making sure to slightly overlap them (good vocabulary word for them). Once that was completed, they were free to embellish their snowmen with the scraps of coloured paper. I brainstormed with the kids some things they could add, as this helps kids who need more guidance and ideas (we're not all creative, right?!) Some ideas they shared: hats, scarves, buttons, face, sun, trees, etc. Many of the boys asked if they could add legs- I find it so interesting that only the boys ask this.

 
Tadaaa!


Sunday, December 9, 2012

Reindeer at the Window Collage


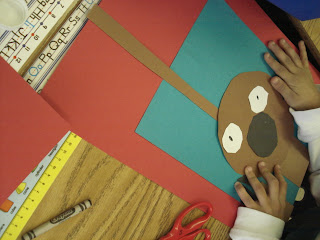
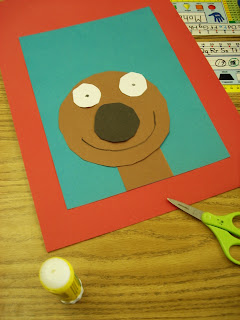
This is one of my favourite holiday projects to do with young students. These "reindeer looking in the window" collages were created by Grade 1 students. I've done a 'Rudolph' version as well which you can see here. (You simply substitute a red nose)

This is a good project to reinforce shapes and cutting/pasting skills.

For this project you simply need:
  • scissors
  • glue sticks 
  • large red paper for the background/border
  • blue paper
  • brown paper
  • scraps of black, white paper and any other colours the kids want

We use plastic lids to trace the heads and other lids lying about (baby food jars, glue stick lids, etc) to trace circles for the nose and eyes. The neck, arms and antlers are varying widths of long rectangles. And the hooves are simply black squares cut in half (two triangles). I demonstrate all the steps first, asking the kids what the shapes are as I go along. Once everything is glued on, they use crayons to add any details they want (pupils, eyelashes, eyebrows, mouth, etc).
I always find the expressions on these so cute and funny :) !!!
As well, I find the reindeer themselves really represent/express
the personality of the student that created it.


Grade 1 results- Ta da!


Tuesday, November 27, 2012

Sketchbook Drawings


Here are some Grade 10 sketchbook drawings- the assignment was to 'draw something sticky'. 
The drawings also had to be done from direct observation- the best way, in my opinion, 
to improve one's drawing technique. 
I love looking at my students' sketches- there is something so pure and classic 
about a well done drawing.


Friday, November 23, 2012

Snowmen Drawings


I love the little snowman on the right 'presenting' the larger one!

Little kids drawings are so adorable and charming and sweet and innocent. 
Grade 1 students made these snowmen drawings in preparation for our snowman collage project which I'll post next week. I gave very little direction for this other than having a little discussion with the kids about the different 'colours' of snow and the different sizes used in a snowman (small, medium and large). 
From there they did their drawings with pencils and coloured with coloured pencils.
I think they're all so sweet. ♥♥♥

Rainbow Snow Family!


Very advanced snowflakes!


Saturday, November 17, 2012

Dominican Republic Carnival Mask


This is a mask lesson I developed, along with the Kindergarten teacher, when I taught at a school in the Dominican Republic a few years ago. Our school was having a Dominican cultural day in which all classes were involved in various activities. I decided to organize a simple carnival mask-making project, in which my Grade 9 students would help the lower elementary students create their own mask.

I had previously visited the famous carnival held in the town of La Vega in February. It was loud, colourful, exciting, and, did I mention loud? The masks are all very different depending on which region of the Dominican you're in. In La Vega, as you can see below, the masks are very devil-inspired and very frightening and ornate, with horns, teeth, feathers, rhinestones, etc. The elaborate costumes are sewn months in advance. 
You can read more about Dominican masks and how they are made 
(a complex papier mache method made in a mold) here.


Here are some masks that were being sold in the streets in Puerta Plata. Notice how different they are in comparison to the La Vega masks. They have a mouth like a duck bill and many spikes on their horns. Many of these are painted in the style of the Dominican flag and also splatter painted using glossy house paint which makes them quite durable and waterproof.

 Hanging below them are vejigas which are these super hard balloon-shaped 'thing' that the performers swing around and whack spectators on the butt with- it is so painful and almost knocks the wind out of you!


Mini masks for sale at a souvenir shop.


So for the project that I had the students make, I wanted a really simple version- something that could be made in a 30-40 minute session. So we made simple flat masks out of coloured paper, markers and glitter. I had my Grade 9 student pre-cut all the masks beforehand as it can be tricky for younger students to cut out the eye-holes. Once the younger students came in, I paired them up with an older student, and then they decorated their mask with markers. Finally, the Grade 9 student helped them glitter the mask. 
They were so happy to use glitter!!! And I love seeing my older student work with the younger ones- they are always very responsible and afterwards really appreciate our job as teachers having to guide and keep the little ones on task and listening.


These masks are not really made for wearing (too flimsy) but the kids had to try!!


Here are the basic steps:  I gave some ideas for different masks styles- you basically want an oval head with a variety of different horns and eye holes. Look at Dominican masks online for inspiration.


To make the mask symmetrical, fold a piece of paper in half and only draw half of the mask.
Then cut out. I use scarp paper for the initial mask...


So here are some templates.


Use these to trace onto light coloured paper- I recommend a smooth coloured paper like cardstock and not construction paper as it doesn't take markers very well (it dries them out).


Cut out the mask (younger students need help cutting the eye holes) and then decorate with markers. 


For an even simpler mask, if you have less time, just let the kids apply glue 
(or show you where to apply it- much cleaner) and add glitter.


For older students, you can trace the masks onto heavy-weight white paper and 
paint them with watercolours.


Related Posts Plugin for WordPress, Blogger...