ABOUT THIS BLOG

"A Faithful Attempt" is designed to showcase a variety of K-12 art lessons, the work of my art students, as well as other art-related topics. Projects shown are my take on other art teacher's lessons, lessons found in books or else designed by myself.
Thanks for visiting!
LAND ACKNOWLEDGEMENT I acknowledge, with deep respect, that I am gathered on Treaty 7 territory. I acknowledge the many First Nations, Métis and Inuit whose footsteps have marked these lands for generations. I respect the histories, languages and cultures of all the Indigenous peoples of Canada, whose presence continues to enrich our community.

Friday, October 23, 2015

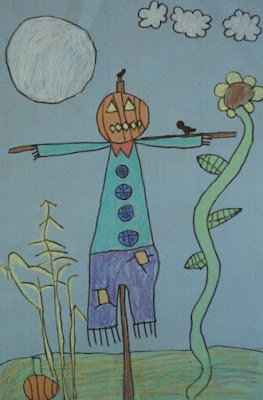
Scarecrow Illustrations


Here are some adorable scarecrow illustrations made by my Grade 2's. The goal was to have them add as many details as possible- to show them that details add interest to a work of art. We want the picture to tell a story and we want the viewer to spend time looking at their artwork. 

We started off by looking at photos of actual scarecrow and noting the different types of detail on them (patches, plaid shirt, old, ratty clothing, some type of hat, straw, etc). 
They drew these on 12x18" pale blue construction paper. Then they outlined them in Sharpie and finally coloured them using construction paper crayons.
All in all, this took about 4- 40 minute periods.




Tuesday, October 20, 2015

Wacky Witches Legs


This was a super fun Halloween art project I did with my Grade 4-6 mixed elective class- the famous "Witches Legs" you see all over Pinterest. I'm not sure who posted the original project but I looked at lots of different blogs for inspiration.

I *believe* the original source for this lesson, of which there are now many variations, is HERE.

My students started off by painting a striped background on heavy white paper using tempera pucks.


While the background dries, prepare your legs and skirt. I pulled out my big scrap paper box plus grabbed some of the bright coloured copy paper from the photocopy room :)
Students went to town and needed very little assistance.


Once the background paper is dry, glue the skirt and legs on. 
I find white glue sticks better to painted tempera surfaces.


I brought out all my little 'bits & bobs' for decorations: buttons, sequins, lace scraps, 
stick-on jewels, glitter glue, etc. The cheap $1.50 bins near the checkout at Michaels are a great place to find lots of fun, sparkly, stick-on crafting items.


I love how they all turned out!


Friday, October 9, 2015

Pumpkins: Observational Drawings


An easy observational drawing project I do with my Grade 3's during October. I buy mini decorative pumpkins and place them on the tables around the room. Students draw these first in pencil on purple construction paper. I show them how to use curved lines to try to achieve a realistic drawing. Then they colour these with construction paper crayons. 
I also demonstrate how to add a highlight for an even more 3-D look. 
This took my students about two- 40 minute periods but some finished in one period.

Their classroom teacher is going to have them do some creative writing about their pumpkin and then we'll display the art + writing on the bulletin board together!


Saturday, October 3, 2015

Autumn Leaves Watercolour


This is a lovely Autmnal watercolour lesson that I found HERE on the "Colorful Art Palette" blog. I tweaked it a little by using liquid watercolours for the whole project, whereas she used black wax crayon for the background.

I did this lesson with a mixed class of Grades 4-6. They started off by drawing a leaf (the oak leaf was BY FAR the most popular one!) on a piece of cardstock. They cut this out and this was used as their tracer or template. Some students chose to do more than one leaf.


They traced their leaf onto heavy white paper. We talked about how to visually create a sense of movement on their art, like the leaves were gently blowing in the wind. Once all their leaves were drawn, they outlined everything in Sharpie.


I finally order liquid watercolours this year. I read THIS POST a while back on the amazing Deep Space Sparkle blog and she gave such great ideas on how to use them that I finally bit the bullet. It took a while to track down the sauce/condiment cups with lids (my Costco doesn't stock them) but I finally found a wholesale restaurant supply store that sells them. TIP: take you tempera puck tray with you to the store as there were many sauce cup sizes to choose from and I initially bought a size too big. So I took one tray with me the next time and got a better size. The sauce cups (with lids) are great for storing mixed acrylic paints as well- my high schoolers use them alot to save paint from class to class.

I bought the brand "Handy Art" liquid watercolours. Overall, I'm happy with them, but the black colour is definitely not black- more like a navy blue as you'll see in the finished artwork below. Next time I guess I'll bust out my black India ink for the background step, but it's so stinky (and stains) that I generally don't like using it with my younger students. 

Anyhoo, my students loved the liquid watercolours and request to use them alot now!


It took a couple classes to paint the leaves.


The last step is to paint the background. We went with "black" (not really) but blue or turquoise would also be really pretty.


Some of the early finished ones:


this student gave their background 2 coats of paint to make it more opaque. I prefer this.


Related Posts Plugin for WordPress, Blogger...