ABOUT THIS BLOG

"A Faithful Attempt" is designed to showcase a variety of K-12 art lessons, the work of my art students, as well as other art-related topics. Projects shown are my take on other art teacher's lessons, lessons found in books or else designed by myself.
Thanks for visiting!
LAND ACKNOWLEDGEMENT I acknowledge, with deep respect, that I am gathered on Treaty 7 territory. I acknowledge the many First Nations, Métis and Inuit whose footsteps have marked these lands for generations. I respect the histories, languages and cultures of all the Indigenous peoples of Canada, whose presence continues to enrich our community.

Tuesday, November 30, 2010

Wayne Thiebaud Dessert Paintings


Grade 10 students learned about the art of American Pop artist Wayne Thiebaud. I brought in a bunch of cupcakes and donuts and the students spent some time drawing and shading them in their sketchbooks first. Then they started with acrylics- mixing colors, building up layers and shading and highlighting. Some used acrylic thickener medium to give a real impasto effect to the frosting.


These cupcakes remained scarily 'preserved' for the two weeks that we used them....


mixing different tints to get realistic shading for the pink frosting

adding the white highlights last


Great job Grade 10's!


glued on real sprinkles


detail showing the actual thick texture


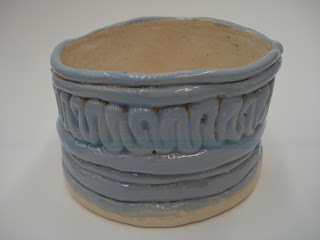
Coil Vessels


Grade 10 students made coil vessels for their clay unit. I demonstrated various methods of building the vessels: using coils, spirals, balls, swirls, etc. The "scratch & attach" method of joining was crucial for these to hold together. 


After glazing... drum roll please....
Ta da!


Monday, November 29, 2010

Clay Snowmen


Grade 6 students made these super cute clay snowmen. 
This is my take on the lesson found at the fantastic website Deep Space Sparkle.

The only requirement was that the snowman had to be carrying something. I first demonstrated how to make a simple snowman using three different sized balls and using the 'scratch and attach' method simply using water. You really need to emphasize that the kids can't make anything thinner than a finger, otherwise it can easily break off during the drying process. Once the snowmen are finished, have students carefully poke a hole all the way up through the snowman with a pencil. This will help it dry in the middle and hold it together better.

The final snowmen carried a variety of objects, from baguettes, to lollipops, to hot cocoa, candy canes and even a chainsaw! These ones are dry (after about 2 weeks) and ready to be bisque fired. I make sure to really let them dry thoroughly to prevent any 'blow-ups' in the kiln.


After bisque firing:


Now they have been painted with glaze (we used Mayco Stroke & Coat)


  For glazing, the kids were instructed to paint on 2-3 even coats, not to miss any spots and to leave about half a centimeter free from glaze at the bottom of the snowman (to prevent them from sticking to the kiln shelves during firing- I hate stilting). They also have to sponge the bottoms off afterwards and then I double check them after school as well.
These are so cute and we got multiple offers to buy the entire set. 
Great job Grade 6's!


Al Capone- normally I don't allow guns/violence but this one was done in humour
and I think it's just so ironic with a snowman!

Hey, snowmen don't have to be white!

Carrying a bunny

Gorgeous hair!

C'est un bonhomme du neige Francais! Avec une baguette! Tres mignon!


Chainsaw wielding snowman- watch out...

check out the beak on this one- I can't believe it didn't break off!


a little black humour on my part...

The French one is ignoring the offer of cookies- all in good humour!!! 
I love France!! 
Related Posts Plugin for WordPress, Blogger...