ABOUT THIS BLOG

"A Faithful Attempt" is designed to showcase a variety of K-12 art lessons, the work of my art students, as well as other art-related topics. Projects shown are my take on other art teacher's lessons, lessons found in books or else designed by myself.
Thanks for visiting!
LAND ACKNOWLEDGEMENT I acknowledge, with deep respect, that I am gathered on Treaty 7 territory. I acknowledge the many First Nations, Métis and Inuit whose footsteps have marked these lands for generations. I recognize the land as an act of reconciliation and gratitude to those whose territory we reside on or are visiting.

Sunday, October 30, 2011

Happy Halloween!


Happy Halloween everyone!

Here's some pics of my decorated door: I cut out a haunted house from black paper, and cut out lots of windows. The I took a bunch of photos of my students making scary faces and glued them behind. My Kindergarten students made the tissue paper collaged pumpkins on the bottom of the 'hill'.


Unfortunately I didn't get any finished photos of this Grade 5 pumpkin project below, but the photos can give you an idea. You need bleeding crepe or tissue paper for this project. We used crepe paper. Draw a simple pumpkin and /or jack 'o' lantern on heavy-ish white paper and colour in the face with a black oil pastel or permanent black marker. Then cut out lots of squares of your crepe paper. Wet a small section of paper with water and a paintbrush and lay a square of crepe paper down. The ink from it will seep onto the white paper. Leave the crepe paper on for about 5 minutes or so and peel it off. 
Do the background a contrasting colour or combination of colours. 

WARNING: this method seriously stains fingers, at least the crepe paper we used did. So make sure they wear rubber gloves if this is going to be a problem.  

You might notice in these photos that about half of my students like to work standing up, the other half prefer sitting. I always find this so interesting.


notice the blue stained fingers...


Saturday, October 22, 2011

Andy Goldsworthy Nature Inspired Project


This is a Grade 11 project inspired by the work of one of my all-time favourite artists, Andy Goldsworthy.

From Wikipedia:

Andy Goldsworthy, is a British sculptor, photographer and environmentalist producing site-specific sculpture and land art situated in natural and urban settings.


The materials used in Andy Goldsworthy's art often include brightly-coloured flowers, icicles, leaves, mud, pinecones, snow, stone, twigs, and thorns. For his ephemeral outdoor works, Goldsworthy often uses only his bare hands, teeth, and found tools to prepare and arrange the materials.

"I enjoy the freedom of just using my hands and "found" tools--a sharp stone, the quill of a feather, thorns. I take the opportunities each day offers: if it is snowing, I work with snow, at leaf-fall it will be with leaves; a blown-over tree becomes a source of twigs and branches. I stop at a place or pick up a material because I feel that there is something to be discovered. Here is where I can learn. "


Goldsworthy regards his creations as transient, or ephemeral. He photographs each piece once right after he makes it. His goal is to understand nature by directly participating in nature as intimately as he can.
  "Each work grows, stays, decays – integral parts of a cycle which the photograph shows at its heights, marking the moment when the work is most alive. There is an intensity about a work at its peak that I hope is expressed in the image. Process and decay are implicit."


You can see more photos of his work at his website here.

Before I begin this project, I show students photos of his work on the whiteboard and then show an excerpt from his stunning DVD entitiled "Rivers and Tides".  The video shows Goldsworthy at work, in nature, creating various pieces. Some of the most interesting parts are when his creations 'fail', and he just sighs, sits for a while and then starts all over. It's a great point of discussion for the idea of 'not giving up' and learning how to just simply move on from any setbacks or frustrations.


Students were asked to create a work of art, using any media and subject matter, but it needed to incorporate some natural materials. Ideally, you would want to do an outdoor installation and photograph them, but these students needed the work for their portfolios and year end exhibition.
Here are some of the results:

This student enjoyed drawing portraits. So she created an 'earth, wind, fire and water' type of composition incorporating feathers, raffia, twigs and sand.

sketchbook practice from a photo reference


This student was working with the idea of Rock 'n' Roll, so she created a pair of Ray Bans out of cardboard, painted them and then collaged pressed flowers she had collected into a landscape-type composition. 


This student created a stylized portrait using oatmeal for the skin and incorporated leaf prints
into the painted hair.


She practised leaf printing in her sketchbook ahead of time to work out the right colours.


A charming collage she created in her sketchbook using pressed leaves and flowers.


Overall, I was impressed with the variety of creative solutions the students came up with in incorporating natural elements into their art work.


Tuesday, October 18, 2011

Frankenstein Drawing


This was a guided drawing lesson I did with a Grade 1 class. I like to show them how to draw things by breaking them down into simple shapes. For Frankenstein, I always start off with a little explanation of the man/monster and then do a really bad impression of him walking, with my arms outstretched, and then I moan a bit. Most of the kids think it's hilarious, but there's always a couple that are a bit scared!

Anyway, we start off with the head- a big oval with a flat top, then add the rest of the features. We didn't include a neck- simply the shoulders as a straight line to the edge of the paper and a collar for the jacket. I draw it with them, step-by-step in their sketchbooks first, then they draw it themselves again on a large sheet of paper. Outline all the lines with a black marker. Then they coloured them with oil pastels. Looking at these now, I realize we put the bolts in the wrong place- for some reason I thought they came out of his temples, when, in fact, they come out of his neck. My bad.

These drawings always turn out really wacky, funny and a bit creepy!

Tuesday, October 11, 2011

Black Cat Collage


This is a Halloween project I created for my Grade 3/4 class. I find that any animal-based projects are a big hit in the elementary grades, especially Grades 3 and 4, as they are just crazy about animals.

So start off by painting your background paper. We did a checkered, or gingham type pattern with orange tempera on white paper. I had them mix their own shade of orange using only yellow and red tempera. This way, you also get a variety of orange colours which is nice. Purple backgrounds would also be effective.
Using a flat brush, paint stripes one way...then the opposite way.


While the background paper is drying, begin the cat. I demonstrated on the whiteboard how to create a cat from simplified body parts: a big round head, smaller oval-ish body, two ears and a tail.
Students could add more details if they wished. Students draw this in a sheet of white paper. 
You could also use black paper to save time. I gave students the choice to paint their pieces with black tempera or colour them in with oil pastels.


Then cut all the pieces out.


And glue stick them onto your background painted paper. Now you have a blank canvas to work with in terms of adding embellishments for the face, etc. We simply used scraps of colored paper and white paint to add faces to our cats. You could also use pom poms, glitter, scrap fabric, etc.  Whatever you want!
I find the kids personalities really show in these in terms of how they draw their cats. You get fat ones, skinny tall ones, little, tiny feminine ones, etc. They all turn out super cute.


Here are the Grade 3,4 results.
Ta da!


Wednesday, October 5, 2011

Oil Pastel Resist Halloween Art


This is a very cool resist effect which I thought was suitable for Halloween art. If you don't celebrate Halloween in your school and/or country, pumpkins or leaves would be a nice Autumn theme alternative.

This project is a take on 'tempera batik', but instead of a layer of thick tempera paint, this is a simpler version using oil pastels. I will warn you- this *can* be a tricky process and results vary according to different materials, brands, etc. I suggest to try it out yourself first to perfect the technique before you teach it to a class. You can also see my tempera batik lesson here.

Here's what you need:
  • oil pastels
  • basic chalk (yellow, whatever you have)
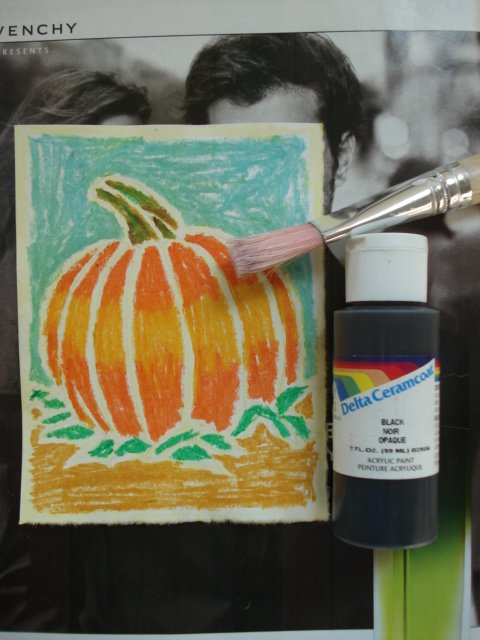
  • black acrylic paint or India ink or black liquid watercolours
  • heavy white paper (I used smooth cardstock)

Start by drawing your Halloween (or pumpkin) image with pencil.


Outline all pencil lines with a thick line of chalk. I included a border as well.
The chalk lines will end up black in the end.


Now colour in the image with a thick layer of oil pastels. You don't need to fill in all the white paper, but you do need to layer on the oil pastels really thick. You can also try this will wax crayons, but I felt the results weren't as bright. But it does work.


Once you're finished colouring, you can wipe off some of the chalk with a slightly damp sponge.
Now paint over a layer of watered down black acrylic paint or India ink over the entire image. 
*Important*  Drying time seems to be the touchy part of this process. I used acrylic paint and let it sit just 5 minutes before I washed it off. India ink might be different. Test it first yourself.


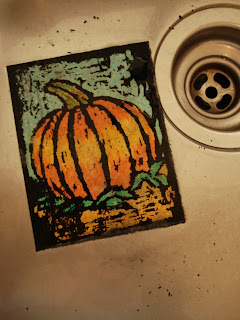
Now take it to the sink and gently sprinkle it with some warm water to soften the paint. In the class, I stand by the sink and wash each student's one at a time (I know...). It seems to work out fine as most students work at different paces, so there's never really a mad rush for the sink.
 It's just so easy to get this part wrong: turn the water on too hard and your paper rips, wipe too hard and the paper rips, wipe too little, etc.


Ok- so let it soak a bit, then gently run a small trickle of warm water over the paper- gently 'scrub' off the paint with your fingertips. You will find that it will come off quite easily from the oil pastels part. Don't rub all of it off- leave some bits sticking here and there for the resist effect.


Don't go answering the phone or something at this stage- once, I was washing these after school, and I was actually letting one soak in the sink full of water (I think I used India ink that time and it's harder to get off) and a teacher came in to talk to me, and I completely forgot about the art. The next day I came in to find a clump of dissolved paper mush in the sink. I managed to salvage a piece about 2 inches wide. I mounted it and returned it to the student with an  "A+" written on the back. The student, thankfully,wasn't upset as he was super easy-going  (and wasn't even close to being an 'A' student so he was actually happy!)  We had a good laugh about it as a class and I told them it was a lesson for me in paying attention to the task at hand.

Anyway, so once you've taken off the amount of paint that you like, let it drip dry a bit and then place it in the drying rack or a stack of newspapers to dry. The paper's wet and fragile at this stage, so be careful.
Once dry, if you find too much black paint has come off in certain areas (it happens), you can always go back in with a thin brush and touch it up with more black paint. Like I said, it can be an unpredicatble process, but it's an interesting process.


Here's some previous Grade 6 results:


This one was made with wax crayons.


Related Posts Plugin for WordPress, Blogger...