ABOUT THIS BLOG

"A Faithful Attempt" is designed to showcase a variety of K-12 art lessons, the work of my art students, as well as other art-related topics. Projects shown are my take on other art teacher's lessons, lessons found in books or else designed by myself.
Thanks for visiting!
LAND ACKNOWLEDGEMENT I acknowledge, with deep respect, that I am gathered on Treaty 7 territory. I acknowledge the many First Nations, Métis and Inuit whose footsteps have marked these lands for generations. I recognize the land as an act of reconciliation and gratitude to those whose territory we reside on or are visiting.

Tuesday, August 22, 2017

Painted Paper Plate Yarn Weaving


After a few years of having this project on my 'to teach' list, I finally got around to trying paper plate weaving with my Grade 4-6 mixed class. I saw the original idea HERE on the amazing website of Cassie Stephens. I followed her direction exactly and the weavings turned out really well. 
I HIGHLY recommend only using Chinet brand plates as Cassie states. I tried it with a thinner paper plate and it did not hold up well. So stick with Chinet or the sturdiest brand you can find.

Students started off by painting their plates using tempera. They could use any colours/patterns they wanted to. They had a lot of fun with this step and thought it was pretty cool painting on plates.


They didn't fit in my drying rack so we left them on the floor to dry overnight.


I collected yarn like a madwoman from garage sales and thrift stores. Then a colleague, who I was sharing yarn with, colour coded all the yarn into different plastic bags- sweet! I laid all these out onto a couple of tables so my kids could see the variety of colours and textures available.


Following the directions on Cassie's blog, students wrapped their warp (I demonstrated two times, then we did it together) and then they started weaving using the same warp string. My kids have done paper weaving before and most caught on pretty quickly. Once they have had enough of one colour, they tie on a new colour and keep weaving.


The kids LOVED this project and they all turned out really nice :)


Sunday, August 20, 2017

Paper Loop Flowers


An easy and fun summer craft that would make a lovely Mother's Day craft. I did this with my Grade 4's during the last week of school- it was simple enough to prep for a teacher tired at the end of the year yet fun enough for my kids to keep them busy and entertained for two classes! Win!

They started off by painting heavy sheets of white paper (cardstock works great) 
with liquid watercolours. Let these dry.


The next class, students used a ruler to measure 2cm strips on the back of their paper. 
Some wanted to make them thinner.


Then they traced a circle (use a lid) onto construction paper and decorated then. They glued their paper strips into loops and glued those onto the back of the circle.
I found bubble tea straws at the Dollaw Store- they worked much better for the 'stem' than regular straws- much sturdier. I used a glue gun to attach the kids flowers to the straws.


Some Grade 4 flowers:


Friday, August 4, 2017

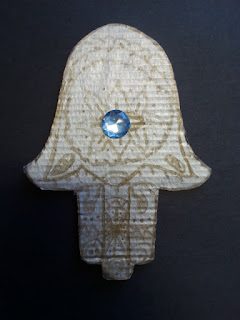
Hamsa Hands


The Hamsa is a palm-shaped amulet popular throughout the Middle East and North Africa and commonly used in jewelry and wall hangings. Depicting the open right hand, an image recognized and used as a sign of protection in many times throughout history, the hamsa is believed by some, predominantly Jews and Muslims, to provide defense against the evil eye.
I teach this lesson to my junior high students as part of my unit on "The Art of Islam". I show them actual hamsa hands that I own (jewellery, a clay wall hanging and a hammered brass mirror. I also ask students to bring in any examples they have. Students then do some research on their laptops, looking up different types of hamsas. Then they draw out a template from photocopy paper and use this as a pattern to trace onto a piece of cardboard. I've then tackled this two ways: students papier mache over the cardboard in order to cover the raw edges of the cardboard. This technique takes much longer as more drying time is involved. Another class I simply had them prime their hamsas white one class, then the next class they designed their hamsa. They use their paper template to draw their ideas onto. They need to include some type of eye. I provide glass blobs and plastic gems to use for decoration and for the eye. Then they can use paint or markers to create their designs.
Some Grade 7,8,9 results:


Related Posts Plugin for WordPress, Blogger...