This is an art project that uses body parts to create a large banner. It is a very personalized artwork that is especially suitable to primary grades.
This was actually the first art project I ever taught in my first job with my first Kindergarten class. Today, I doubt I would try this on the first day of classes with a group of 4 and 5 years olds I have never met!! However, as a first year teacher I was somewhat inexperienced but very enthusiastic and jumped head first into this project!
I found this project in a very old education magazine about nine years ago- I have no clue what it was called and have looked extensively online for the source, but have had no luck.
So, whomever developed this lesson- thank you!!
Here's how we made these banners:
Note: you can easily adapt the materials you use for these- use whatever you have or are comfortable using with your class.There are six sheets of artwork. If I did this again, I would have pre-printed all the lines on each sheet and made enough copies for each student. Live and learn, eh?
We completed about one sheet per class. Have another project or some free drawing/coloring on the go as you need to work one-on-one with students and there is drying time involved. It's very helpful if you have a parent helper or teaching assistant to help you with this project. Trust me.
Also, have folders ready for each student to store the in-progress sheets in.
The first sentence is:
"my lips kiss like prize-winning roses..."
So simply get some cheap-o red lipstick, put it on the kiddies lips and have them kiss the paper to make the roses. I was afraid the boys would think this was totally wierd, but they, in fact, loved it and laughed alot. The kids draw stems and leaves and grass with markers and watercolours or crayons. Whatever you want.
The next line is:
"my hands paint butterfly wings..."
So, paint the kids hands whatever colour you want, use tempera paint, and make two handprints for the wings. Using scrap paper, collage on a body and then have the kids decorate the wings however they want (collage, paint, crayons, glitter, etc.)
The next line is:
"my thumbs gently place ladybugs on a leaf..."
Have the kids draw and cut out a leaf from green paper. Then paint their thumbs red and print them all over a green paper leaf. Let dry and then add ladybug details with a black marker.
The next line is:
"my fingers can identify my whole family..."
Using scrap coloured paper, have students create something that represents where they live (house, apartment). My sample is a generic house, but it's nicer if the kids try to create something more personal, if possible (depending on the age and ability). This would be a time to review simple shapes with Kindergarten kiddos. Then, paint the kids' fingers and have them press down the number of people in their family. My kids liked to include their pets as well. Let dry and then have the kids draw on faces/features onto their little figures with fine markers.
Next line is:
"my fingerprints make flowers bloom..."
Have the kids draw stems and leaves with a marker.
Then, using a variety of paint colours, make fingerprint flowers.
OK- last line- phew!
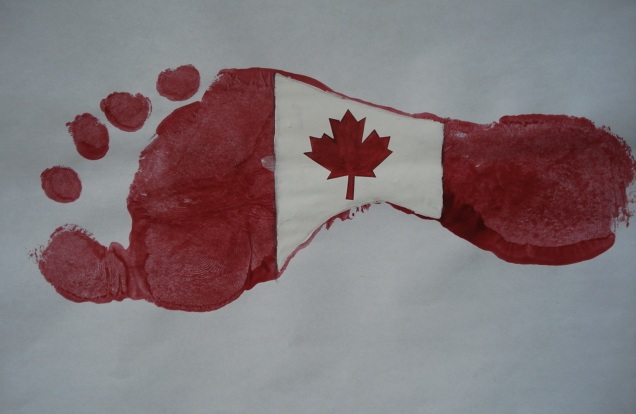
"my feet march with **insert city/province/state/or country** pride."
"A Body of Art"
Now you need to paint each student's foot (be prepared for loads of giggles as it's totally ticklish) and print that onto a sheet of paper. Let dry, then draw the details of the country flag and paint those on. Hopefully you don't have an impossible flag like a maple leaf which is actually incredibly frustrating to draw!!!
Ok- assembly time. You can create a long vertical banner like I did, or even hole punch them in the top corner and tie them together in a little book format. Whatever works.
I used a large sheet of coloured paper (in this case wrapping paper) and glued all my sheets on.
Lastly, because I didn't pre-print my sheets, I had to glue the sentences on. I painted them with some watercolours first to add some more colour and help them stand out. But it's easier and takes less time to print all the sheets out ahead of time. Trust me. It's also fun to add some glitter at the very end. I love glitter.
Here's my finished sample. Unfortunately I don't have any photos from my students, but they were all super cute as only little kids art can be! They are all different and personalized due to the kids' colour choices, etc.
To send these home, I simply rolled each one up and secured with an elastic.