Grade 6-12 students learned about the Blackfoot tradition of winter counts and created their own version using traditional Blackfoot and Plains pictographs.
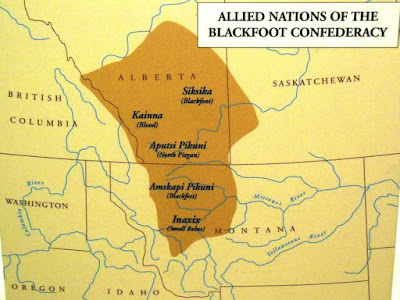
The Blackfoot nation is made up of four nations. These nations include the Piegan Blackfeet, Siksika, Piikani Nation, and Kainai or Blood Indians. The four nations come together to make up what is known as the Blackfoot Confederacy, meaning that they have banded together to help one another. The nations have their own separate governments ruled by a head chief, but regularly come together for religious and social celebrations. The Blackfoot are today located throughout Alberta (Canada) and parts of Montana and Saskatchewan. Traditionally, they had a way of life centered around buffalo hunting.
I recently attended a two day workshop on the Siksika Nation reserve near Calgary, Alberta (Canada). We learned about the rich culture and history of the Siksikai’tsitapi, in their natural environment, to enhance the implementation of programs for our students.
During the workshop, we were given a tour of Old Sun College, a former residential school where many atrocities happened. Today it is a First Nations run college. Inside the library is a beautiful buffalo hide winter count on display.
I also saw a reproduction of a Blackfoot winter count robe at the interpretive center at Head-Smashed-In Buffalo Jump World Heritage Site located near Fort McLeod, Alberta. This is a UNESCO-designated World Heritage Site that preserves and interprets over 6,000 years of Plains Buffalo culture. Through vast landscapes, exhibits, and diverse programming, people can learn about the cultural significance of this cliff to the Plains People.
The photo below shows one of the only translations of symbols I have ever been able to find in my research.
This winter count depicts 115 years of Peigan life. They were a simple way of keeping track of time. Each year during the first snowfall one significant event was painted onto a hide or some other material/item. The one above covers the time period between 1764 and 1879 and is thought to be one of the longest winter counts on record. This count depicts (in spots, see photo below) the arrival of short-haired Europeans (1), the arrival of the Mounted Police (2), the threat of smallpox (3), and finally when the buffalo disappeared (4).
Winter Count Calendars
Traditional Plains calendars are called winter counts because among most Plains tribes they feature a single pictogram that defined the entire year. Prior to using the Gregorian calendar, Blackfoot people counted years according to 'winters' rather than European calendar years. Before the late 19th century when buffalo became scarce, winter counts were painted on buffalo hides. The annual pictograms could be arranged in a linear, spiral, or serpentine pattern.
Many Northern Plains tribes like the Blackfoot, Mandan, Kiowa, and Lakota used winter counts extensively.
The winter count was so important that each tribe would designate a winter count keeper. Traditionally, the winter count keeper was a man. He was also the historian for the tribe. It was the responsibility of the keeper to provide an oral history of each image drawn on the winter count.
Every winter elders would gather and discuss things that happened throughout the year. They would consult with the keeper to select the most important event of the year. Then the keeper would draw or paint an image on the winter count hide to represent the event. The images on the winter count were used as a reminder to help the keeper remember the events. After the image was completed, the keeper would explain the events in detail. The images on a winter count were arranged in chronological order.
Process and materials
Buffalo hides, as well as deer, elk, and other animal hides, were painted. In the past, Plains artists used a bone or wood stylus to paint with natural mineral and vegetable/plant pigments. Before contact with Europeans they used natural pigments. Later they used commercial dyes obtained through trade.
This video from the Cooper Hewitt, Smithsonian Design Museum describes the Lakota tradition of creating winter counts.
I used this winter count as inspiration for a project to do with my students on National Indigenous Peoples Day (June 21st) at my school. It's a day recognizing and celebrating the cultures and contributions of the First Nations, Inuit and Métis Indigenous peoples of Canada. No exams can be held on this day.
I printed out a buffalo hide template (HERE) and enlarged it onto 11 x 17" paper. I pre-tinted them all a light brown using liquid watercolour. I also made a handout for my students using the pictographs found on the winter count I photographed at Old Sun College. Most students went with the spiral composition, starting at the center and spiralling outwards. We used Sharpies and some chose to add some traditional colours of blues, red and ochres.
Update: Handouts: finding handouts of actual Blackfoot winter count symbols was almost impossible. Here is an image that might be useful:(SOURCE)
I also used parts of this lesson plan from Saskatchewan:
Here are some of the finished ones:


