
This was a lesson I found years ago in a 2003 issue of 'Arts and Activities' magazine. It was entitled: "Designing the Matwork on Your Art ... or the Artwork on Your Mat". It's essentially a foil embossing project utilizing line and pattern.
I didn't have embossing foil, so we used heavy duty barbecue foil folded 4 times into a square instead. It totally worked. Here's how we did it:

I cut strips of foil, about, er, um, 6 inches wide or so...

Fold it four times, try to keep it smooth, until you have a square. I try to keep the dull side of the foil on the outside, but it's not crucial. You can add dots of glue in the corners between the layers to keep it all nice and flat and together- lay a heavy book on top to help it dry flat.

You need to do the embossing on top of a 'soft' surface: stack of newspapers, magazines, etc.
We used fun foam sheets.

Materials for the embossing stage: foam, foil, dull pencil.

So then students emboss a pattern; it can be totally abstract or have realistic images. They need to aim to have different patterns coming out from all sides, b/c these are going to be extended off the page onto black paper later with pencil crayons.

Embossing finished.

Then paint on a coat of black acrylic paint- get into all the indentations, then gently wipe it off with some paper towels until you get the effect you like. This helps 'age' the foil and brings out the relief more. Let dry.


Then use white glue to glue it onto a piece of heavy black paper. This student used too much glue- naughty, naughty! This will show up when it dries, so demo to kids the right way to apply white glue. Just dots.

Kids used scraps of black paper to test out their colours before committing to their good copy.
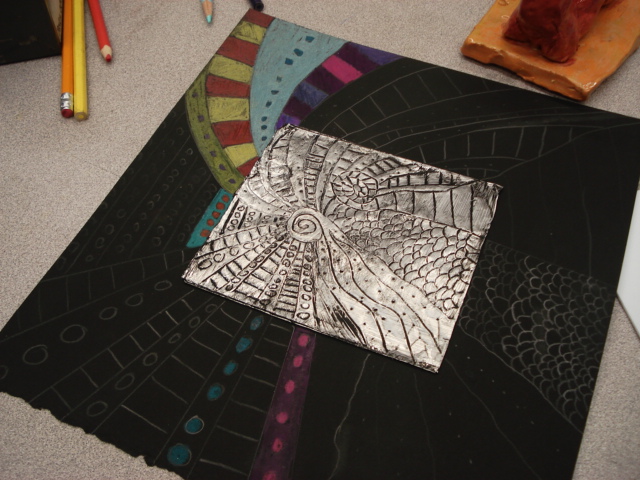
Pencil in lines and patterns first- extend the patterns of the foil. Then colour using pencil crayons. They show up really well on the black paper.

Grade 8 results: Ta da!


9 comments:
These are really nice. Good Job.
Thanks Gabriela!
Hi Miss
I just discovered this post via Pinterest. Wow - looks great! I just tried a similar method using folded pre-cut foil, but it was just too thin. Maybe more folding will do the trick. I have never seen crayon pencils before - I would love to try those out.
Rina
Hi Rina,
Thanks for your comment!
For the foil, make sure to use 'heavy duty' or 'barbecue' foil. It's stronger than regular tin foil. Ours had 4 layers and it worked quite well.
Oh, and pencil crayons are what we call 'coloured pencils' here in Canada! Laurentien is a popular brand here but getting more difficult to find.
Hi...absolutely stunning work.Thanks for sharing. I have succeeded with the foil bit..looks great.. but the crayons i have don't show up nicely :( Probably of poor quality. What ones can you recommend other than the ones you used?? Living on a small island.. so limited..
Thanks
Christine: thanks so much for your comments and I'm happy you've tried out this project!
You're right- good quality coloured pencils can be hard to come by, depending on where you live.
I'm not sure what stores you have where you live, but the BEST brand are Prismacolour: highly pigmented and blendable. You can find these at Staples, Michaels, etc.
Other good brands include Faber-Castelle, Derwent, Staedtler (basically any pencils made in Germany, Austria, France, or the Uk are of high quality)
Student quality brands include Crayola, Reeves, Sargent, Lyra and Prang all which, I think, should work well. Having said that, I only have experience with Laurentien, Lyra and Prismacolour.
I also find the black paper you use affects the colour- really, really black paper works best. Black construction paper is more of a dark grey so doesn't provide the contrast.
Good luck!
That's wonderful. Thanks for your sharing. Great idea for me.
Awesome!!!
My students are finishing their metal alamos. I think I may have them finish them like you did with a patterned frame on scrape pieces of matt board. I am thinking silver sharpies on the black might look cool.
http://itisartday.blogspot.com
Beth
Thanks BlueGrass and Beth!
Post a Comment