ABOUT THIS BLOG

"A Faithful Attempt" is designed to showcase a variety of K-12 art lessons, the work of my art students, as well as other art-related topics. Projects shown are my take on other art teacher's lessons, lessons found in books or else designed by myself.
Thanks for visiting!
LAND ACKNOWLEDGEMENT I acknowledge, with deep respect, that I am gathered on Treaty 7 territory. I acknowledge the many First Nations, Métis and Inuit whose footsteps have marked these lands for generations. I respect the histories, languages and cultures of all the Indigenous peoples of Canada, whose presence continues to enrich our community.

Wednesday, February 18, 2015

Snowy Owl & Northern Lights


This is a cute little project my "Storybook Art" class made. This class is composed of students from Grade 1 -3. We read a picture book then make an artwork inspired by it. It's an elective class at my school- I really like teaching it! The students are all super dedicated little artists :)

This lesson came about when I realized about 20 minutes before class that I had nothing planned so I dashed to the Grade 3 classroom and frantically asked the teacher if I could borrow a book- I scanned her bookshelf and snagged this one: Arctic Fives Arrive.  I had no idea what the book was about or what type of art lesson we would do but I knew the kids would have some suggestions, hahaha :)

The book is very cute and basically tells the story of a group of Arctic animals gathering together on an iceberg to view the northern lights. The book rhymes and demonstrates how to count by fives. First, five snowy owls perch upon an iceberg. They are followed by five polar bears. Next, five ermine show up, and then five walrus, five Arctic hares and five musk oxen join the crowd. All the animals settle in for a view of the Northern Lights.


The iceberg gets very crowded very quickly, lol
I loved the apprehensive expression on the snowy owl's faces so we decided to draw them. 
We tried the ermine but I, for the life of me, couldn't even draw it!!  
It kept looking like a weird rat so we went with the owl, lol.


Students drew the snowy owl in pencil first, then outlines it using our KING SIZE Sharpies. This would ensure we could achieve the bold black line that was evident in the illustrations.


Then the coloured the eyes yellow and cut the owls out carefully.


On blue construction paper, students created Northern Lights by blending chalk pastels.
Then they washed their hands and carefully glued the owls on top- we had to use white glue as glue sticks just don't stick to the dry chalk pastels surface.


this one captured a mouse AND has earmuffs!


Saturday, February 14, 2015

Valentine's Projects Galore


My classes got through a few Valentine's Day projects last week- here's a few of the highlights:

I have a special class on Fridays called "Storybook Art". It's an elective class elementary students from Grade 1-3 can choose to take. We read a story then make an art project inspired by it. Yesterday we read the cute book "Mouse's First Valentine".  The story was very simple and probably best suited to Grade 1, but oh well- the kids liked it and it has beautifully painted illustrations.


We created out little mouse first. I demonstrated on the whiteboard how to draw the mouse using basic shapes. Then they drew theirs on blue construction paper using white construction paper crayons. Then they coloured it in and cut it out.


To make the valentine, we cut a red heart slightly smaller than a white heart paper doily and glued them together.


Glue the mouse to the Valentine and write a message to someone you love!


Grade 6 students made heart chains inspired by this post from the blog "Kids Artists".
They really enjoyed it- I taught them how to draw a paper chain and then let them decide how they wanted to colour them. Most used markers and/or pencil crayons. This was a fairly time-consuming project, though, so most didn't finish last week.


My Grade 1 students made the classic craft: Heart Buddies. A pretty easy project for a day when kids are hyped up on sugar- we had sooo many treats brought to school yesterday...
I just precut strips of red and pink paper on my paper cutter for the arms and legs. I taught the kids how to accordion fold- great for fine motor skill development. Also a great lesson for teaching the classic technique of folding paper in half and drawing half a heart in order to get a symmetrical heart. I'm always surprised each year by how many students don't know how to do this.


My Grade 2's made patterned hearts. I had them make a folded symmetrical heart on white copy paper. Again, always surprised how many kids don't know how to do this, or they draw their half heart on the open side as opposed to the folded side and end up with two pieces...
Anyway, then they traced this onto white construction paper. They traced over this heart shape with my awesome KING SIZE Sharpies (they love these, lol). This creates a bold line. Then, they used a ruler to draw 4 lines dissecting their heart. They use a thin black line for this- we discussed contrast and line variety at this stage. We want to the big heart to really stand out. Then they created patterns within the heart. They coloured these with either markers or pencil crayons.


Wednesday, February 4, 2015

Faux Stained Glass


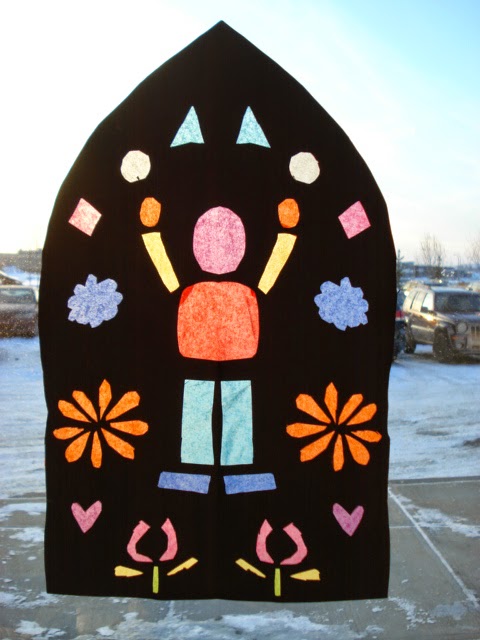
I'm currently teaching a unit on Medieval Art to my Grade 6 art class. We started off with making our versions of beautiful stained glass windows. We looked at medieval examples (Saint Chapelle in Paris is a GREAT example) as well as various rose windows. Then we watched a video about how stained glass windows are made (very old technique that hasn't changed much). 

To create our own 'faux' stained glass, we used the classic technique of black construction paper and colourful tissue paper. We folded a large sheet of construction paper in half- on one side draw a frame and then your design within that. This technique ensures a symmetrical design.
Poke a sharp pencil through all the shapes in order to get your scissors in there and cut out the shape. (this avoids having to use an x-acto knife).


I pre-cut a bunch of tissue paper into smaller manageable sizes.


Cut your tissue paper pieces slightly larger than the actual cut out shape. Glue on using a glue stick- seriously- some of my kids used white glue at first and it was a hot mess! Some got so messy (too much glue), so yeah, stick with glue sticks!!


Grade 6 results! They look amazing hung in classroom windows!!


Related Posts Plugin for WordPress, Blogger...