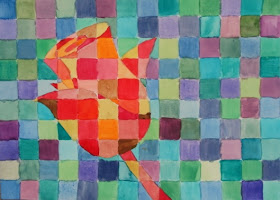
This is a watercolour project I recently taught to a Grade 8 class. It is useful for reviewing warm and cool colours as well as for learning how to use watercolours in a controlled way. Here's how we made these:
First, students measured a grid onto their white paper- I think I encouraged a 3cm size square, but to accomodate students who need more help, they can use a larger size. Some students chose to go smaller. So measure out the lines with a ruler in one direction....
Then the same size in the other direction and you have a nice grid.
Draw a design on top- I encouraged fairly simple shapes (or a shape) that filled the paper nicely.
This student chose more than one shape.
Then, using watercolours, students needed to decide on either warm or cool colours for the background and then the opposite for the shape(s). Colours need to be transparent, so add lots of water when you mix them. Move around the paper- don't work on squares side-by-side as you run the risk of having colours 'bleed' into each other.
For the watercolour brands, I use two types to get an even wider variety of colours: Prang and the Russian brand Yarka (student grade). I prefer the Prang brand, though, and they are much cheaper.
Here are some of the results: Ta da!
 |
| This student chose a methodical pattern of colours. |


Oh my! I guess we (art teachers) all think the same. I just did something like this with my 1st grade. I love the ones your 'big kids' did with you!
ReplyDeleteI do this with 6th graders, but we use colored pencils. Love the look of watercolors.
ReplyDeleteVery cool! I really like these grids... I may have to try it my students. Anna:)
ReplyDeleteMrs. Hahn- yes, that's the great thing about art projects- some can be easily adaptable to different grade levels. I've had Grade 12 students who want to do the same projects they've seen me do with my Kindergarten students! lol
ReplyDeleteJanie- I also tried this with coloured pencils last term- they worked great as well.
Anna- thanks!
Beautiful work - will have to try this next year with my kiddos. Thanks for sharing the step by step!
ReplyDeleteWhat a great project to demonstrate warm and cool colors.
ReplyDeleteBeautiful! I love the choice of using watercolour paint.
ReplyDeleteThank you all!
ReplyDeleteHow did they keep the watercolors bleeding into each other? I feel like my students would make a mess of this - but then maybe they’d slow down for once!
ReplyDeleteStina- great question. Students are encouraged not to paint two squares beside each other. They jump around the composition, letting a square dry before they paint a square beside it. Alternatively, if they have good fine motor skills, they leave a thin white line between each square. This prevents bleeding. Hope that helps!
ReplyDelete