ABOUT THIS BLOG

"A Faithful Attempt" is designed to showcase a variety of K-12 art lessons, the work of my art students, as well as other art-related topics. Projects shown are my take on other art teacher's lessons, lessons found in books or else designed by myself.
Thanks for visiting!
LAND ACKNOWLEDGEMENT I acknowledge, with deep respect, that I am gathered on Treaty 7 territory. I acknowledge the many First Nations, Métis and Inuit whose footsteps have marked these lands for generations. I respect the histories, languages and cultures of all the Indigenous peoples of Canada, whose presence continues to enrich our community.

Saturday, January 7, 2017

Red Birch Tree Collage


This project was inspired by a cup of coffee :)  A certain popular coffee chain had lovely birch tree holiday cups this past year. I thought it would make a great winter lesson. I taught this to my Grade 3 class- it was very easy for them and most finished in one 40 minute period. Next year I'll probably make it a Grade 2 lesson as it wasn't challenging enough for my Grade 3's, though they seemed to enjoy making them nonetheless.


We started off with red photocopy paper. Then each student got a sheet of white photocopy paper and cut out the trees. Then, using half a sheet of white photocopy paper, they ripped a snowy hill.


Then they used the scraps of white paper to cut out or tear little branches. Finally, the black marking were added in Sharpie. The final step was to add dots of snow using white tempera paint.


Some Grade 3 results:


Saturday, December 31, 2016

Cardinals


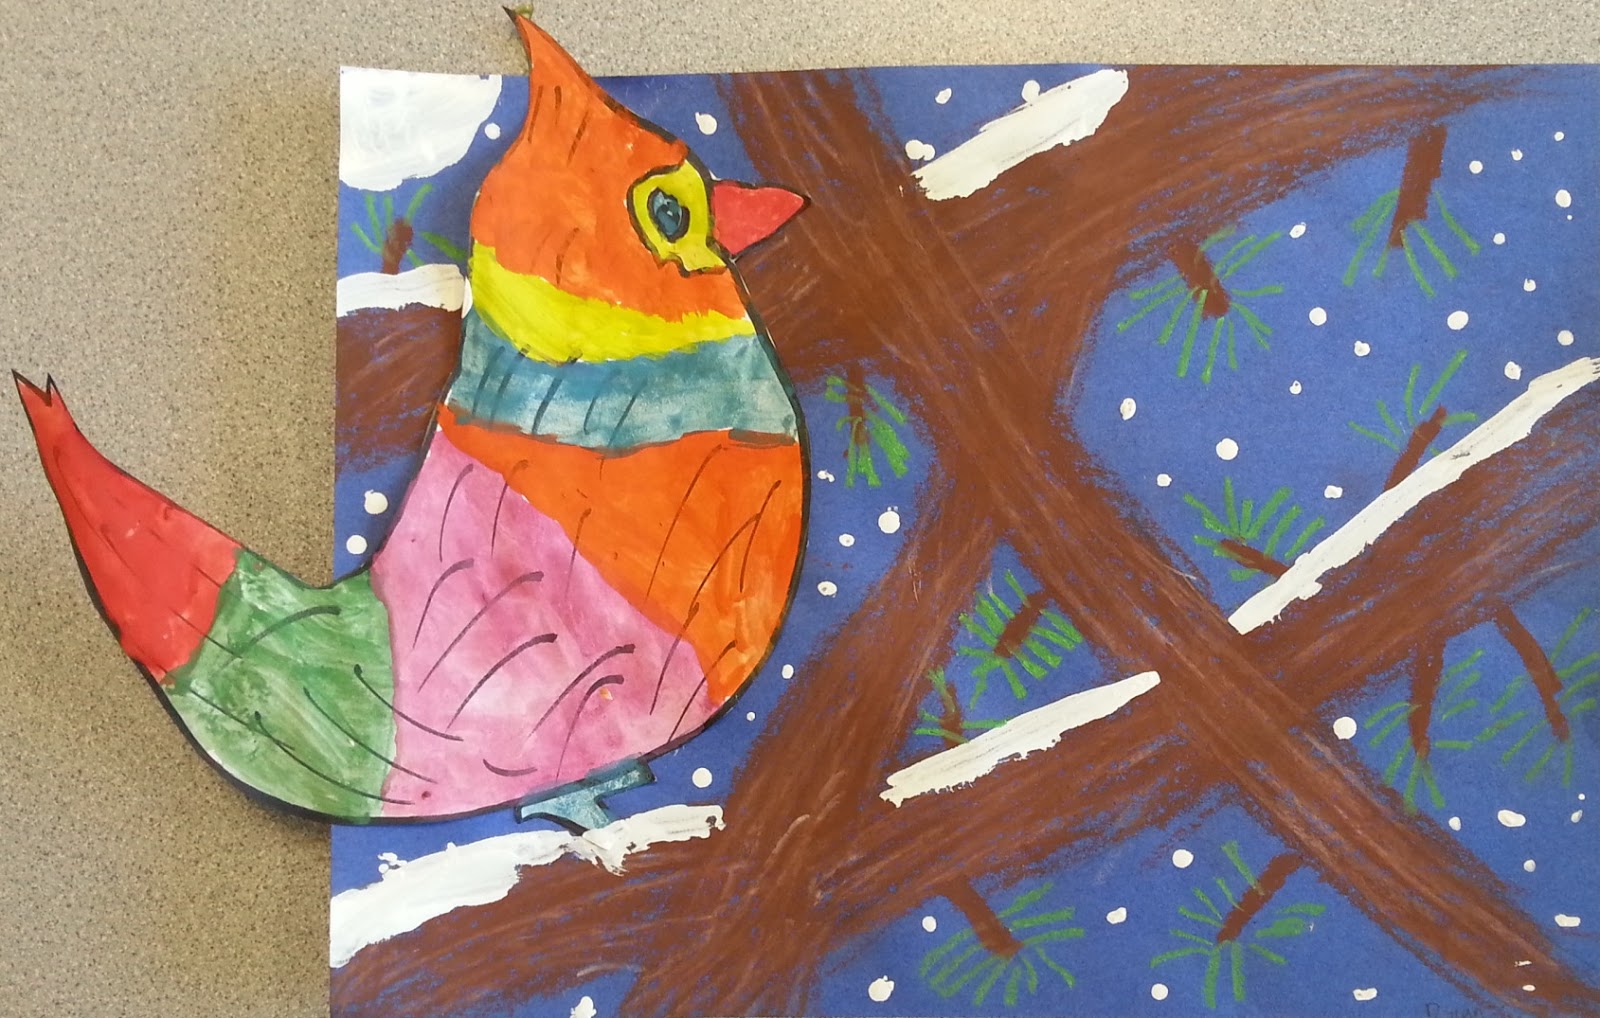
Here's a mixed media winter cardinal project my Grade 2 students finished before Xmas break. 
I love the bright red of cardinals and they have such a graphic quality to their bodies, so it's a fun lesson to teach.

See my other cardinal lesson HERE.

Students started on Day 1 by drawing a cardinal on 9 x 12" heavy white paper. They outlined their drawing with a jumbo Sharpie, then painted it using tempera paint. Once dry they were cut out.
The next class they created their background.  Students chose a background colour of 9 x 12" construction paper. In pencil, they drew on a branch. For a challenge, I showed students how to overlap branches. They coloured these in using oil pastels. They were encouraged to mix colours for a more realistic effect. Lastly, white tempera paint was dabbed onto the top of branches and painted onto the sky for snow. Then they glued on their cardinal. I hot glued on a red feather for a wing for those students that wanted one.


Thursday, December 22, 2016

Faux Stained Glass

Santa Karl Marx, haha!

This was a project my junior and high school classes started right before the Christmas holidays. Most didn't get a chance to finish- I underestimated how long this project would take- but a few finished so I'll show those. You can tie this lesson into any unit on Medieval art where students learn the history and technique of stained glass.

I've seen a few 'faux' stained glass lessons like this online (here's one example) and have always wanted to try it and finally got around to it. Some projects use acetate, others used plastic wrap. I didn't have acetate and tried plastic wrap and didn't like it so I used plastic sheet protectors (much cheaper than acetate!!) instead which worked great.

Students had to design their own stained glass image- it could be Christmas or Winter themed or anything they wanted, really. They drew it on regular photocopy paper then slid it into a page protector. Then they traced over all the pencil lines with a black Sharpie (for the lead lines) then coloured in the image with coloured permanent markers. Areas left blank will show the silver aluminum foil in the background. Once that's all finished, you cut away just the top sheet.


Cut a piece of thin card (we use old cereal boxes) the same size as your plastic sheet (about 8 x 10").
Rip off a sheet of aluminum foil slightly larger than the card and crumple it up then flatten it out. Wrap it around the card and tape it on the back.


As you see below, you'll have an aluminum foil covered cardboard with your image on plastic.


Staple the plastic on top of the foil. The staples actually really doesn't show which is nice.


These were really difficult to photograph with such a reflective nature! 
The photos don't do these justice- they are so sparkly and shimmery with the aluminum foil!


You can also tape around the border with coloured mini duck tape or electrical tape.


a detail of Santa Marx

Thursday, December 1, 2016

Torn Paper Collage Candles


The theme for our upcoming school Winter Concert is 'light'. I try to incorporate this theme into some of my art classes. I found THIS pin on Pinterest and thought it would be perfect for my Grade 3 class.

On heavy white paper, they used tempera discs and painted a yellow and orange circular pattern that would represent the candle light's cast light.


Then, on smaller white paper they painted one sheet colours for their candle, a yellow sheet for the flame and a green sheet for the wreath/greenery a the bottom of the candle.


The next class, students tore a shape for their candle, then the flame. 
Once glued down they ripped long rectangular pieces for the greenery. 


I love the simple charm about these!


Sunday, November 27, 2016

Penguins in Watercolour


I've started my 'winter' themed lessons with my younger students, even though it (surprisingly) hasn't snowed here yet. Kids love penguins so I knew this project would be a hit with them.

I used one of the drawing lessons from Art Projects for Kids. Kathy always has amazing step-by-step drawing lessons that really help some students. I gave my Grade 2 students the option of using the drawing handout (after I demonstrated it to them) or to draw their own penguin. 
Once drawn, they outlined it in Sharpie then used watercolours to paint them. 
I love all the different personalities!


I think this is a Harry Potter penguin, haha!

Another Harry Potter penguin- with a wand!


Related Posts Plugin for WordPress, Blogger...