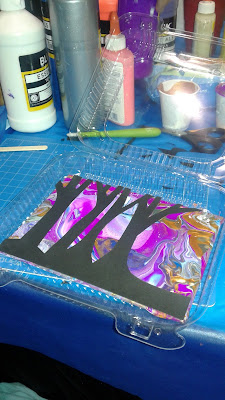
For any art teachers that have attended a big art conference, there's often times workshops you can sign up for. This project was one of those. I will say, though, that every art workshop I've attended at a conference, I've never actually taught the lesson to my students! Crazy, right. I have no idea why. Well, sometimes there's too many steps and I'm nervous to do it with a big class, or too many expensive materials, etc. In this case: pour painting. Has anyone done this with an actual class? It just seems like SO much paint is wasted, and we're always very conscious of our budgets, so it's hard!
I've done it with my high schoolers one on one, when they need a particular effect for an art project. But never a whole class at once.
Anyway, I figured I'd share this lesson in hopes that it helps one of you out there!
It was presented at the NAEA annual conference (National Art Education Association) in Seattle a few years back. It's, I believe, the biggest art education conference in the US. Many teachers LOVE this conference. Unpopular opinion, but I was not a fan of this conference and will, most likely, never attend again. Why? Simply because it was too big. Trying to sign up for workshops was near impossible. Many of them were first come first serve, so there was a mad rush between sessions to try and secure a spot. So I didn't get into many of the workshops I was interested in. I maybe had too high of expectations for this conference and was honestly let down.
So this particular workshop was offered by Blick Art Materials, a very big US art supply company. They have a great website with free lesson plans Find the PDF lesson plan for this project
HERE.
I will say I really enjoyed this workshop!
Description:
Pour tempera paint in layers from a cup, then watch gravity create amazing, marblized patterns.
Add a landscape sihouette and the pour becomes a blazing polar aurora in the night sky. Include glow-in-the-dark glitter glue and the auroras will actually glow when the lights are out.
Starting with black cardstock, I cut out a landscape silhouette using an X-acto blade or scissors.
Set this aside for now.

Then, using the same size canvas board (I think this was 5 x 7"),place it in a shallow tray or on paper to protect the table,
Pour about three or four "aurora" colours of tempera paint into a small cup. You can also add some glow in the dark glue. I was shocked that this paint wasn't thinned down with water or pouring medium. I honestly thought it wouldn't work, that it would be too thick to flow.
Flip onto canvas board and wait 30 seconds for all the paint to flow down.
Then tilt it in all different directions, getting the paint to flow and cover the whole board. It gets thicker and slower as it starts drying, but don't give up. I think I had to coax some paint onto the empty spots.
The workshop had some clamshell plastic containers for us to take our art home as obviously it takes overnight to dry.
Lasts step, place your black paper cut-out on top. Let dry flat overnight.
They had another example on display using some different supplies.
All packaged up and ready to go. Yes, I had to carry this with me all freaking day!!
Pretty!


