
This was a super fun project my Grades 4- 6 mixed elective class did at the end of this school year. They LOVED this project- some even made 2 or 3. I pretty much followed the excellent instructions posted HERE on the "We Heart Art" blog. She found the idea on the Fine Lines blog.
I was worried we would have to use that chunky yarn (of which I had none) but regular yarn worked well. I collect empty cereal boxes from my students all year long and stockpile them for projects such as these. Students drew some type of abstract pattern on the card. I encouraged them to use shapes as opposed to open lines as we would be colouring these in. Of course some did non-abstract images and some used some open lines and they all worked out regardless :)
Once the lines were drawn, students passed over the lines using regular white glue. Then they put pieces of yarn on top. We let these dry overnight.


It's important to use heavy duty aluminium foil for this next step. It's just sturdier and thicker.

Students cut a piece off the roll that was about an inch larger than their cardboard.

Then they covered the back of the tin foil liberally with a glue stick. They need to use ALOT and do it carefully in one direction so the foil doesn't bunch up and rip. Other blogs used spray glue for this step but I didn't have any- the glue stick worked pretty well.
Then put the foil over-top and, starting from the center, gently rub over the design using a small square of felt. It really works for buffing the foil over the yarn. Take your time with this step- the more you carefully rub around the yarn, the better the final artwork will work. Some students tended to rush this step.

Once it's all glued down, I show students how to neatly wrap the foil onto the back- a technique I used during my book-making phase ;)

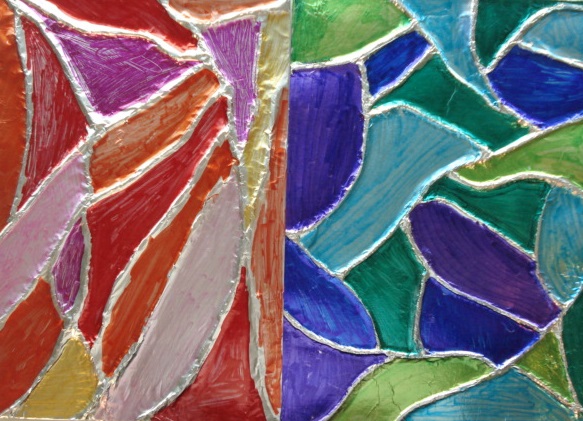
Then the fun part: colouring the whole image with coloured Sharpies!
Don't colour the raised yarn part.
Here are Grades 4 - 6 results:


 |
| This students did 2: one using cool colours and one using warm colours |


Another great idea from a great blog! We tried this out on paper plates; see the results at http://penarthblast.blogspot.co.uk/
ReplyDeleteThanks! Your kids did a great job- I love the idea of using a paper plate. You can then tie in radial design, etc.
ReplyDeleteMy Sharpie pens won't stay on the foil, they just pretty much evaporate or wipe off! IS there something you did to prepare the foil? Thanks
ReplyDeleteAnonymous: I didn't do anything at all to the foil. Make sure you're using permanent markers. Aluminum foil tends to have one side less shiny than the other (slightly duller). Try colouring on that side and see if it helps.
ReplyDeleteI couldn't get the sharpies to work either but then I bought another mark of aluminum foil and it worked.
ReplyDeleteWonderful! I'm a grown up and going to do it myself!
ReplyDeleteWow... Amazing....great idea.
ReplyDeleteAnonymous #1: good tip. I had no idea different brands of aluminum foil would react differently to the Sharpies. I buy heavy duty barbecue foil.
ReplyDeleteAnonymous #2: I made one and it was super fun! Definitely try it!
Anonymous #3: thanks! This project was not my idea but it was fun!
Hello Miss! thanks for sharing the project, I am going to do it with my students of grade 5 as the summer project, I hope warm colours' theme will work perfectly.
ReplyDeleteMy students had a great time doing this activity!! Thank you!
ReplyDeleteSanaa and Anonymous: thanks for your comments!
ReplyDeleteDo you think this would work with paint on the foil? I want to try an analogous color activity with random designs...
ReplyDeleteHi Andrea- I've never painted on foil before but apparently it can be done? https://www.firstpalette.com/tool_box/quick_how_to/coloredfoil/coloredfoil.html
ReplyDeleteI am also going to try this with my students.I loved all the work your students did.Thanks.
ReplyDeleteI loved your students work.I will also be trying this with my students. Thanks
ReplyDeleteI used this process with 3rd graders to make realistic fish sculptures.
ReplyDeleteUsing the netting that bulbs and fruit/veggies come bagged in made it easier. I love your students' work. Thanks for great ideas!
Great idea. I am.going to try this bc it is very difficult for me to produce a nice design! TY
DeleteParabéns pela ideia,adoro pessoas que dividem o que é sabem,trocam informações,pois só acrescenta em nossa vidas.
ReplyDeleteVou fazer com meus alunos
Anonymous: thank you!
ReplyDeleteHerr PJ- thank you and good luck!
Anonymous: great idea with the plastic netting!
Ritocaartescriativa: Obrigado!
Just wondering what spray adhesive would be recommended?
ReplyDeleteRobin: I've never tried this with spray glue before so can't say.
ReplyDeleteThese would be great with alcohol inks. I've got to try this with my grandchildren.
ReplyDeleteLoved your idea, going to give it a whirl with encaustic wax.
ReplyDeleteI’ve also tried this but using only tacky craft glue without the wool. I used a small bottle with a thin nozzle. It was very quick to trace over the initial design on the first pass but then it needed more time as I had to re-glue some spots then wait for them to dry.
ReplyDeleteAnother “colouring” method is to use liquid black shoe polish from a bottle with a sponge applicator. It made a lovely brushed metal look