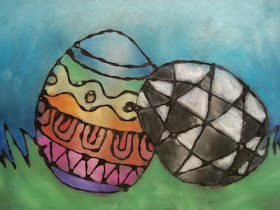
This is a fun and relatively simple Easter project I did with my Grade 7 students. It's the classic 'chalk pastel on black paper' project that yields such great results. I've used this technique with Halloween pumpkins as well. I find students really love this project.
Here's how we made these:
First, students 'drew' easter eggs directly with clear glue (Elmers) onto black construction paper. They had to have at least two eggs and they needed to overlap in order to give a sense of space. They could add any extra details they wanted (ie: grass, bunny, chick, basket, sun, spring flowers, etc.) I tell students to always have the tip of the glue bottle touching the paper for more control and not to have any super small shapes as the glue will just end up bleeding together into a blob.
Let these dry flat overnight.
Detail of the clear glue- it will, though, dry flat and super shiny.
Next, we colour these with chalk pastels. I demonstrate how to achieve a 3-D look using lighters colours in the middle of the egg and darker colours around the edges.
Mix colours and blend with your finger or paper towel.
Colouring the eggs... Once the entire picture is coloured, use a small damp paintbrush to clean off all the glue lines to make them nice and black and shiny again.
Once they are all colored in, if you have access to a laminator, it would be great if you could laminate them all in order to protect them. Chalk pastel is sooooo smeary and I've yet to find a decent spray fixative that actually works- if any art teachers out there have suggestions of a good brand, please let me know!!
Ta da!
 |
| LOVE the long grass with it's highlights in this one. |


Wonderful! I love the highlights. Cute lesson idea and just in time:) Thanks for sharing.
ReplyDeleteThese are so beautiful.
ReplyDeleteI have to try this idea with the glue.
I love chalk pastels, the colors come out so soft.
Thanks! Yes, kids really love this project because they all generally get really good results- the chalk pastels are fairly forgiving when it comes to blending and mixing colours.
ReplyDeleteI did this with flowers and fish in the 4th grade and the results were wonderful! The kids are thrilled! Still not sure what to use as a fixative, though. Thanks for the post!
ReplyDeleteMrs.Skojec: I'm glad they worked out for you- post a link if you've blogged about your results!
ReplyDeleteOkay, here is the link:
ReplyDeletehttp://artclassideas.blogspot.com/2011/05/glue-pastel-images.html
We've used chalk pastels in class numerous times and I use cheap hairspray (spray outside, after school) to set the pictures! Cheap and works wonders! :)
ReplyDeleteI love your site! I was wondering what brand of tempra you recommend?
ReplyDeleteMrs. Skojec- your kids flowers turned out beautifully!
ReplyDeleteAnonymous- I've used hairspray before, but I've found, perhaps depending on the brand, that it can leave little 'fleck' marks all over the artwork...maybe I just need to find the right brand.
Anonymous: Thanks! I use a bunch of different brands of tempera- whatever our supplier happens to send us, really. But my favourite, by far, is by the brand "PRO ART"- it's a premium quality and dries nice and rich and velvety. The most opaque student quality tempera I've ever used. Second to that, I also like "Sargent" brand.
The blog "Art with Mr.E has a good post on teacher's favourite types of tempera: http://artwithmre.blogspot.ca/2012/01/tempera-paint-issues.html
I second that. I use hairspray instead of Fixatif. Cheaper and smells better.
ReplyDelete