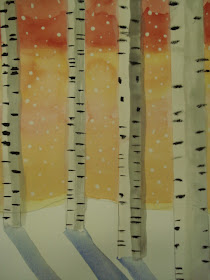
Ah, the ever-popular Birch Trees project! Art teachers, staff, students and parents LOVE this lesson. It always has a high success rate so all students, regardless of their art abilities, can succeed. I love projects like these.
Who doesn't love the stark, bare beauty of birch trees set against the quietness of snow.
 |
| Image Source |
There's lots of steps and lots of different versions out there on other art teacher blogs. I don't know who the originator of this lesson is, but if you're out there, thank you!
Here's how Grade 7 students made their landscapes:
Show students photos or a slideshow of birch trees. Examine and discuss the bark. Discuss and explain the shadows, lighting and colours.
Start by drawing a wavy snow line towards the bottom of heavy white paper
(watercolour paper would be awesome but use what you have.)
Then, using masking tape, tape down some trees making sure to press the edges down firmly so the paint won't seep under. If you want less straight trees, you can cut/rip the edges of the tape with scissors- it's sticky and tricky but do-able.
TIP: To reduce the tape's stickiness, so it peels off the paper later without ripping, I have the kids stick the tape first onto their clothing; something with alot of lint (soft shirt or sweater- even jeans will work). This technique takes aways the excess stickiness and helps it peel off easier later.
 |
| I provide three sizes of tape to help create the illusion of depth. |
Thinner tape goes in the background and thicker tape in the foreground- this gives a real illusion of depth and space. Remind students about background, middle ground, and foreground. Important step: for any tape that is in the snow, kids need to outline these lightly with a pencil- otherwise when the tape comes off, that part disappears.
Test out some nice shadow colors (pale blues, pale greys, etc.) in the sketchbook... and then paint them going straight in one direction: to the right or to the left, onto the snow- these are 'cast shadows'. We just use our regular tempera discs and add lots of water.
Paint the sky with watercolours (we used tempera discs with lots of water added)- sunsets, sunrises, night sky- whatever you want. Blend colours using wet-on-wet technique. Back and forth using a wide, flat brush. This is where kids can get really creative with colour mixing.
I have them practice in their sketchbooks first.
I have them practice in their sketchbooks first.
 |
| testing sky colours in sketchbook first |
Now let it dry.......
 |
| Painted sky and painted cast shadows. |
When painting the sky, you can also sprinkle some salt (regular or coarse salt) onto the wet paint which will create some interesting textural patterns once dry.
Once everything is dry (next class), carefully and slowwwwllllyyy, peel off the tape and you have a clean birch tree. Don't worry about any bits of paint that have seeped under the tape- the black marking later will help disguise them.
Paint a light grey shadow on one side of the tree- the same side your cast shadow is going.
Below you can see I made mine on the right hand side. It is quite faint.
Using a thin brush, paint kind of curved grey/black markings on the tree.
Some students prefer to use a marker for this step.
For the final step, make falling snow by dipping the end of a
brush in white tempera and dabbing it all over the sky.
Grade 7 results:Ta da!


Thank you for the very complete tutorial on how you did this beautiful project of the birch trees in the snow. I sure like how the kids represented so many color schemes. We've done this lesson before and we didn't have so many colorful options. I am more inspired to try it again after seeing the success you've had. Thanks!
ReplyDeleteThey turned out beautifully!
ReplyDeleteThanks Kathy & Kristyn~ it's a fun project and the kids are usually pretty happy with how they turn out.
ReplyDeleteThese are so beautiful, and I love your detailed instructions! What grade did you do this project with?
ReplyDeleteHi Jessica,
ReplyDeleteThanks! These were made by Grade 7 students. It's one of my favouite projects!
I absolutely LOVE this. Awesome results! I usually don't follow another one's project step by step, but this time I will!
ReplyDeleteMerci Laurie!
ReplyDeleteThe kids really liked to play with the colors. Do you mind if I share it on my blog (with a reference to yours)?
ReplyDeleteLaurie: of course, no problem!
ReplyDeleteThe kids LOVED to mix colors in the background. A lot of beautiful results. Thank you for this good idea!
ReplyDeleteI have the kids look at a painting of Monet's Poplars as inspiration for their birch tree paintings. At the end, we use a cardboard stamping technique to make the black lines on the trees. This is a favorite project, they always turn out so beautiful!
ReplyDeleteThanks for providing the detailed instructions. Beautiful works. I like the zebra one.
ReplyDeleteThese really do turn out beautifully. The first batch I made was on heavy paper. The second time, I decided to use a small canvas so we could present these as gifts, but the tape didn't seem to stick very well onto the canvas and the paint seeped underneath. Any suggestions on what I could do to prevent this?
ReplyDeleteLuluuu: what type of tape did you use? I've seen tutorials on canvas where they used masking tape and acrylic paints (as opposed to watercolours). Acrylics shouldn't seep underneath the tape. Maybe just try a different brand of tape that has more adhesion perhaps? Hope it works out!
ReplyDelete